How to Draw a Rooster – Create a Realistic Chicken Sketch
This post may contain affiliate links. We may earn a small commission from purchases made through them, at no additional cost to you.
In the farm coop, roosters are the head honcho. They are gorgeous and, let’s admit it, a little terrifying. Roosters, with their brightly colored feathers and pointed beaks, are excellent themes for farmyard paintings. In our latest drawing tutorial, we walk you through an easy-to-follow sketching technique to help you produce your own original and lifelike rooster drawing. Our lessons are easy to follow, so if you’re ready to start learning how to draw a rooster, collect your creative tools and let’s get started!
Table of Contents
- 1 How to Draw a Rooster Easily
- 1.1 Step 1: Constructing the Rooster’s Chest
- 1.2 Step 2: Creating the Body Shape
- 1.3 Step 3: Constructing the Tail’s Shape
- 1.4 Step 4: Construction of the Head
- 1.5 Step 5: Creating the Rooster’s Comb
- 1.6 Step 6: Creating the Rooster’s Wattle
- 1.7 Step 7: Constructing the Upper Thigh Shapes
- 1.8 Step 8: Creating the Feet and Legs
- 1.9 Step 9: Creating the Outline for the Drawing of a Rooster
- 1.10 Step 10: Adding Texture for the Feathers and Other Details
- 1.11 Step 11: Adding the Base Color Coat
- 1.12 Step 12: Adding Color to the Wattle and Comb
- 1.13 Step 13: Layering the Next Coat of Color
- 1.14 Step 14: Adding Shadows and Highlights to Create a Sense of Depth
- 1.15 Step 15: Layering the Last Shadows and Highlights
- 1.16 Step 16: Creating a Seamless Look for Your Drawing of a Rooster
- 2 Frequently Asked Questions
How to Draw a Rooster Easily
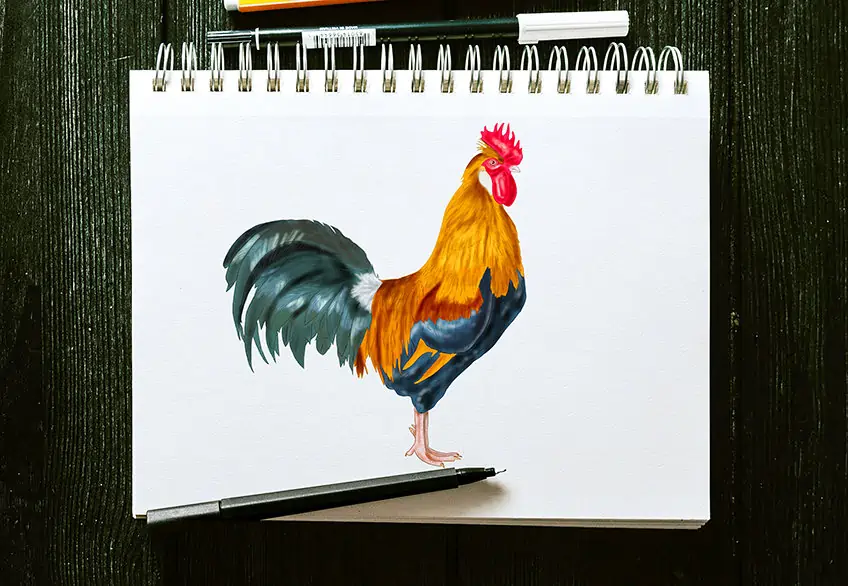
If you’re a lover of roosters or not, they represent excellent sketching subjects. In this lesson, we’ll go through how to obtain amazing ratios and proportions in your drawing of a rooster, as well as how to add an authentic aesthetic appearance. By the conclusion of this lesson, you should have a lovely rooster drawing. The picture below provides an overview of the 16 easy steps that we will take to produce this amazing drawing of a rooster.


We start with building stages in which we put down the basic shapes that will help us produce the most accurately scaled rooster drawing imaginable. You are allowed to use your preferred drawing material, whether it be a colored pencil, acrylic, or digital materials, to complete this instruction. Just ensure to use a light pencil that is easily removed for the first eight stages.
Now, let’s get started on this enjoyable and lifelike drawing of a rooster.
Step 1: Constructing the Rooster’s Chest
If you’ve seen our chicken drawing lesson, you might anticipate that we will begin this rooster drawing in the same manner. However, there is a significant variation in the size of hens and roosters. Roosters are considerably taller and more erect than hens, and we will begin to express this distinction in this initial stage.


Before you begin, make sure to draw this initial construction guideline in the exact middle of your surface. It is also critical to ensure that there is enough room on all corners of this preliminary building form for the rest of the rooster’s body. Construct a big vertical for the chest of your rooster picture. This round shape should be elongated, similar to an expanded egg.
Step 2: Creating the Body Shape
Once that we’ve completed the rooster’s breast and throat section, we can go on to the primary body form. The rooster’s primary section dips downhill somewhat toward the lower-left corner of the painting. To get this look, create a moderately larger oval that covers the lower half of the breast oval and dips down toward the painting’s left-hand corner.


Step 3: Constructing the Tail’s Shape
Roosters are famed for their big and elaborate tail feathers, and we’ll utilize another huge circular structure to assist us in designing the tail in this third stage. The tail circular form should be similar to the primary body circle. The tail construction form should start on the lower side of the main center oval and be inclined moderately upwards. At the completion of this stage, your rooster drawing should resemble the one below.


Step 4: Construction of the Head
So far, all of the structural shapes we’ve utilized have been big ovals. It’s time to take a new approach and utilize a tiny circle to depict the rooster’s head’s base. The head should be somewhat front of and marginally above the highest point of the breast oval. Allow some space between the chest and the head since the Wattle will be added beneath the head shortly.


Step 5: Creating the Rooster’s Comb
In this phase, we’ll draw down the structural form for the comb atop the rooster’s forehead. This vivid red and meaty protrusion is unique to roosters, and the bigger it grows, the tougher and more attractive the rooster. Begin freehand drawing the rooster’s comb on the roof of the skull circle, adding curved slopes and peaks. You may attach the other side of the comb to the frontal part of the rooster’s head, at the tip of the beak.


Step 6: Creating the Rooster’s Wattle
In this stage, you will accomplish two things extremely rapidly. The first step is to sketch the rooster’s beak, starting on the frontal edge of the comb and curling down and back to connect the wattle. The wattle of a rooster is made up of two somewhat oval forms that dangle from below the head ring. The one nearest to us should start underneath the head circle and end with the beak. Half of an oval stretching from the first wattle might depict the other wattle.


Step 7: Constructing the Upper Thigh Shapes
This is a simple and quick step. In this stage, you will design the form of the upper thigh using a freehand curve. The limbs will begin to emerge from behind the plumage in this location. Start at the lowest position of the main structural oval and create a line that bends around and downwards, then drops even more, then rises upwards and rejoins the main circle again.


Step 8: Creating the Feet and Legs
In the last phases of building, we will utilize single lines to form the foundation structure of the rooster’s feet and legs. Create a single line that travels down and then bends towards the side of the canvas in a “L” figure, starting at the base of the last form you created. Repeat this process to create the second leg, then construct three more lines on the foot nearest to us. The first extra line should be at the bottom of the “L,” and the other two should be on the rear of the legs, with the uppermost one being extremely short. You may only add this little top line to the second leg.


Step 9: Creating the Outline for the Drawing of a Rooster
You definitely did not envision all of the building processes that we have just gone through when you chose to sketch a rooster. However, now that we have these building forms, you will see how simple it is to produce the final, properly proportional outline for your rooster drawing. You will form the final contour of your drawing of a rooster using all of the building lines.
Start by outlining the head and protrusion, bringing the wattle up slightly into the forehead, and adding a dividing line in the beak. You may also add a circular circle-based eye to the skull. Add some lined feathery embellishments behind the comb. Proceed to define the remainder of the rooster’s body, carefully following the basic forms but include minor changes to produce a fluid and realistic shape.


Short strokes can be used to give the outline a wispy appearance in specific areas of the body, such as the top of the head, the tip of the breast, and the peak of the rear. Generate a flow of varied size and shape feathers around the underside of the structural shape in the tail area. Some of these plumes should be sharp or silky, and they should overlap somewhat.
When it comes to the feet and legs, utilize the building lines as a starting point and define them on both sides. To complete, add sharp nail embellishments to the tips of each toe, and a bend inside the main structure to resemble the rooster’s wing. When you’re satisfied with the final outline, you may remove any visible construction outlines.
Step 10: Adding Texture for the Feathers and Other Details
If you initially look at the instance beneath, you may be confused by the unexpected quantity of details, but we assure you that it is much easier than it looks. Begin with the rooster’s head and textures to the comb and wattle with little spots and strokes. Tracing the curve of the rooster’s torso, draw tiny lines all through the head and along the neck to give the sense of feather detailing. These lines ought to get larger as you progress through the major body. For the most genuine feathery effect, create these lines one at a time, making sure they don’t overlap.


As you approach the body’s wing-line, you may begin to utilize the short lines to form greater feather forms and keep adding line details to the massive tail feathers. Create a central line in the center of all of these huge plumes, then apply little strokes along either end. To end, paint the middle of the eye black and give depth to the rooster’s feet and legs with little unfinished loops and scrawls.
Step 11: Adding the Base Color Coat
Our rooster design features a variety of hues in various sections of the body. Building up each of these hues progressively is the best method to keep them vivid and authentic. The first hue that we’ll choose is a pale ochre brown. Paint up the rooster’s face, neck, and upper torso with this hue. Make sure to leave the rooster’s head, breast, wings, base, and tail unfilled since these will be colored differently.


Step 12: Adding Color to the Wattle and Comb
Color in the wattle, comb, and face of your rooster design with a tiny brush and a peachy pink or ruby tone of color in this stage. In the following phases, we will apply shadows and illumination to this region of your rooster design.


Step 13: Layering the Next Coat of Color
Although the name implies that we will only be adding one more color in this stage, we will really be utilizing three distinct colors to complete the foundation shades for the whole body of your drawing of a rooster. Start by coloring in all of the residual blank areas of the rooster’s breast with a navy blue color. Next, for the tail plumes, select a dark green-blue color to uniformly paint them in.


Lastly, use a lighter color pink or beige hue to fill in the feet and legs of your rooster drawing.


Step 14: Adding Shadows and Highlights to Create a Sense of Depth
In this stage, we’ll create a feeling of genuine dimension and complexity to some sections of our rooster drawing by using the shadow effect and lighting. Begin by highlighting the comb, wattle, and head of your rooster using a delicate brush and a bit of white color, emphasizing the white paint on the places where sunlight would normally fall.


Applying the same shade of white, add highlights to the tip of the navy blue coloring on the wing and breast area, as well as the distinct tail plumes. Apply a dab of white color to the rooster’s rear where the tail and body connect. To create shadows, dab a little quantity of black color all around the bottom of the rooster’s breast, feet, and tail. To produce a more three-dimensional look in the tail, try to focus the black shades on the plumes that would normally be concealed by others.
Step 15: Layering the Last Shadows and Highlights
In this phase, we will apply the final adjustments to the coloration of your rooster drawing. Begin by coloring in the spot directly beneath the rooster’s head with white. Next, apply shadows around the upper and bottom margins of the rooster’s head using black color.


To produce shade on the yellow area of the rooster’s body, use either black or a deeper brown color, placing much of the shadows on the bottom half of the rear and wing form.
Step 16: Creating a Seamless Look for Your Drawing of a Rooster
This stage is entirely voluntary if you are satisfied with your rooster drawing. In this stage, we’ll remove the edges and textural lines in your rooster design to make it seem more smooth and lifelike. The easiest method to achieve this is to paint over the outlines and texture markings with the matching at each place of the outlines and texture marks. Use a pointed brush and a deeper brown paint to create the feather patterned features on the rooster’s body.


Now it’s time to stand back and appreciate your rooster drawing. If you came here hoping to learn how to draw a rooster, perhaps you now have all the skills and abilities you need to go on and produce many uniquely beautiful drawings of roosters for all kinds of decorative and artistic purposes.
Frequently Asked Questions
Is it Difficult to Learn to Draw a Rooster?
With this simple rooster drawing lesson, we take you through the process step by step, making it enjoyable and simple to make a stunning and convincing picture of a rooster. It is quite simple to grasp how to draw a rooster by using construction techniques and multiple layers of paint.
How Does a Rooster Drawing Differ From a Hen Drawing?
Because they are the both chickens, there is a lot of overlap in the sketching process for a hen and a rooster. However, there are some differences. The big tail, comb on the head, and vibrant plumage help you distinguish the rooster from the hen.