How to Draw a German Shepherd – A German Shepherd Drawing Tutorial
This post may contain affiliate links. We may earn a small commission from purchases made through them, at no additional cost to you.
German Shepherds are big and dignified dogs that have for many years made great companions for humans. They also act as great subject matter for drawing. Drawing a German Shepherd is good for practicing the application of realism to your art. This tutorial will teach you how to draw a realistic German Shepherd drawing in just 14 steps!
Table of Contents
- 1 How to Draw a German Shepherd Step by Step
- 1.1
- 1.2 Step 1: Creating the Main Body for Your German Shepherd Drawing
- 1.3 Step 2: Creating the Head for Your German Shepherd Drawing
- 1.4 Step 3: Creating the Muzzle for Your German Shepherd Sketch
- 1.5 Step 4: Creating Ears for Your German Shepherd Sketch
- 1.6 Step 5: Creating Front Legs for Your German Shepherd
- 1.7 Step 6: Creating Back Legs for Your German Shepherd
- 1.8 Step 7: How to Draw a German Shepherd’s Outline
- 1.9 Step 8: Adding the Fur and Details of Your German Shepherd Sketch
- 1.10 Step 9: Adding the First Layer of Color
- 1.11 Step 10: Adding the Shading
- 1.12 Step 11: Adding Some Highlights to Your German Shepherd
- 1.13 Step 12: Adding the Next Layer of Color to Your German Shepherd
- 1.14 Step 13: How to Draw a German Shepherd’s Facial Features
- 1.15 Step 14: The Final Step to Finishing Your Realistic German Shepherd Drawing
- 2 Frequently Asked Questions
How to Draw a German Shepherd Step by Step
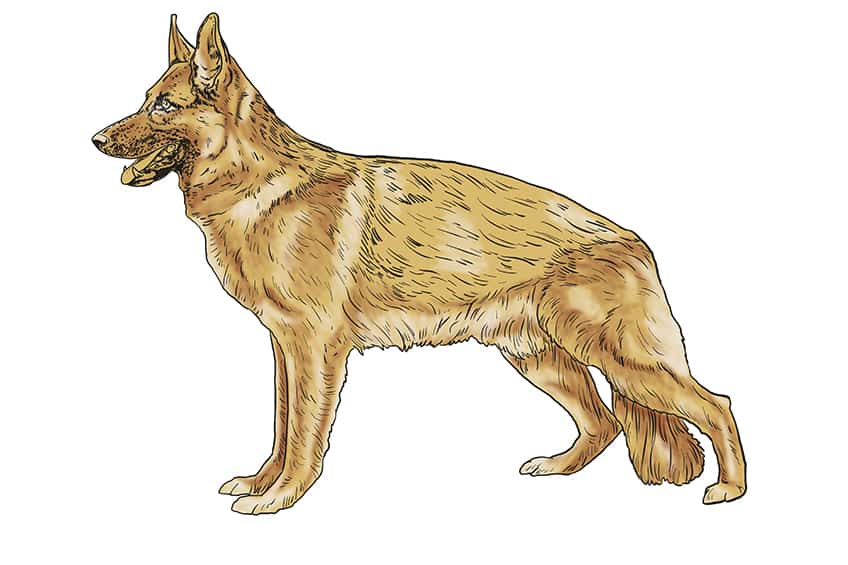
By the end of this tutorial, we will have covered every step necessary to achieve an image similar to the one below. German Shepherds have unique proportions for dogs, with their large ears and back legs that slope downwards from the body. Their coat color is also very distinct. By focusing on getting the coloring and proportions down correctly, we will easily achieve a realistic German Shepherd drawing. Each person’s art journey is unique, so do not be disappointed if your dog looks slightly different from ours!
These instructions can easily be followed and applied to any medium you choose to use, whether you are a tablet artist or prefer traditional paints, you will still be able to follow along.


Step 1: Creating the Main Body for Your German Shepherd Drawing
As with our other animal tutorials, we always begin our sketches by using construction lines to help us lay out the basic proportions, shape, and size of our animal. We will start our German Shepherd sketch by using a large oval shape for the main part of its body. When positioning this oval, keep the finished sketch in mind.
The oval should slant in a way that matches the stance of the dog. The head is on our left, so that will be the side that is sloped upwards. Thus, the right-hand side will be sloped downwards to match the natural direction of the legs.
You will still be adding other limbs around this main oval, so be sure to leave enough room and position the oval in the middle of the canvas.


Step 2: Creating the Head for Your German Shepherd Drawing
The next step in our German Shepherd sketch is quite easy and will not take long to complete. Draw a slightly irregular circle and position it just above the left part of the oval you drew for the body. The irregular shape of the circle is to help with the construction of the head, so keep the left side tilted slightly downward. The top and bottom are slightly flattened, and the right side is tilted slightly upward.


Step 3: Creating the Muzzle for Your German Shepherd Sketch
If we take a look at the final sketch again, we can see that the German Shepherd’s mouth is slightly open. For this next step, we will once again use our construction lines to create the basic shape of the muzzle. First, draw an uneven “U” shape from the upper left side of the head, out towards the left of the page, and then back in again towards the head – this will be the top part of the snout. Now, draw another, smaller “U” from where the last one ended down to the bottom of the head circle. This will create the lower jaw of the dog.


Step 4: Creating Ears for Your German Shepherd Sketch
Their large, upright ears are what make these dogs distinctive from other species. To lay the foundation for the shape, create an “M”-shaped line on the top of the circle you drew for the head. This shape is easy to draw, but careful attention should be placed on the direction of the “M”, which will affect the perspective. The part of the “M” on the right will be the left ear and will therefore be closest to us. The right ear will be on the furthest side from us, meaning that it will be thinner and slightly obstructed from view by the larger one closest to us.


Step 5: Creating Front Legs for Your German Shepherd
In our example sketch, the German Shepherd is not in motion, so the front legs should be together and straight. To create a realistic German Shepherd drawing, we will want to use six lines to create the leg nearest to the viewer and four lines to create the leg furthest from us. From the perspective of the viewer, the furthest leg will be smaller and mostly obstructed from view by the other leg.
Starting about a fifth of the way in from the left side of the body, draw a line straight down. This is the start of the leg closest to us in our German Shepherd drawing.
From that point, you can draw a much smaller line that extends slightly towards the left of the page. Now, draw another line from the body downwards to create the leg, and add a semicircle at the bottom to create a paw. You can separate the parts of the legs with a line.
You can now add the leg at the back, which is similar to the first one, except that the line will start further to the left. This line then must then extend down toward the dog’s right paw by curving gently from the body and downward, following the lines of the other leg.


Step 6: Creating Back Legs for Your German Shepherd
This step follows similar processes to the last one, but the angles differ and the lines used are more curved. Starting with the back leg furthest from us, we will draw a line that slightly curves inward, i.e. towards the edge of your page or canvas. Now, draw a short line that extends outwards towards the left-hand side, and you will have created an ankle!
Now, draw another semicircle for the paw extending from the ankle. Add another line down from the body and connect it to the ankle and paw to finish the leg. For the last back leg, you can go through the same basic steps, but ensure that you make it more curved and thicker than the other one to create a sense of perspective.
The German Shepherd is starting to take shape nicely now, and we can move on to putting on the details to the construction lines!


Step 7: How to Draw a German Shepherd’s Outline
In this step, all our previously created construction lines will help us to create an outline that follows the shape and contour of our German Shepherd sketch. Starting at the head, draw a line that intersects where the head blocks the back ear.
Now create lines for the ears that are more realistic; add lines to the eardrum and inner ear and add an eye on the side in the appropriate place.
The muzzle’s outline can be followed rather closely, but be sure to add a nose. Once you get to the bottom jaw, do not forget to add details such as canine teeth, other smaller teeth, and the tongue of your German Shepherd. You can add a bulge or two on the bottom of the neck, and then extend that line down towards the legs. Trace the legs as they are, but add short strokes to certain parts to create the impression of fur on the legs at the back.


You can carry on using the same strokes to create a furry-looking belly, as well as tail and back legs. You can then draw a line from the back of the legs to the top of the head to finish off the outline of your realistic German Shepherd drawing. Once all these steps have been completed, you can take your eraser and rub out all the construction lines still visible to you.
Step 8: Adding the Fur and Details of Your German Shepherd Sketch
Here, we are going to bring out the depth and texture of the dog’s fur by adding details to our dog’s body and face. Start by shading the lower part of the dog’s nostrils and the lower part of its jaw. Now, around the muzzle, add some short strokes to create textured shading. You can also shade areas of the teeth and tongue. For the final facial details, add some further shading in the ears and around the eyes of the German Shepherd.
When drawing the fur, it is important to the contour and shape of your dog keep in mind.
Ideally, the hairline should flow in the same direction that the dog’s body does. The fur, for example, should flow backward from whatever direction the dog is facing. On the legs, tail, and belly, you can draw the fur flowing downwards. To create a realistic German Shepherd drawing, ensure that the fur on the head is shorter than the fur on the body.


Step 9: Adding the First Layer of Color
For the most realistic end result, we will need to create depth to our drawing by applying several different layers of shading to our German Shepherd sketch. We will achieve a feeling of dimension and depth by starting with a base color and then adding another color layer as well as shading and highlighted areas. Pick a lightish shade of brown as the first base color of your drawing.
This color should fill the entire space within your drawing.


Step 10: Adding the Shading
For this part, pick a darker shade of brown to add some dimension to your German Shepherd drawing. Going around the animal’s belly, inside its legs, hips, shoulders, and muzzle, add shading with the warmer dark brown color.


Step 11: Adding Some Highlights to Your German Shepherd
Pick a suitably light beige color for the highlighting step. Using a soft-tipped brush, apply the color around areas of the body that would not be in shade and would be in direct sunlight. This would include the top of the ears, the top part of the back and shoulders, the sides of the belly, and even the top parts of the paws.

Step 12: Adding the Next Layer of Color to Your German Shepherd
The next layer we are going to add to our drawing is the color black. This time, we will use a medium brush, and starting with the head, add a layer of black around the muzzle area. Then, continue down along its back as well as certain parts of the legs and tail. Now, using a slightly lighter shade of grey, add some color to the nostrils and parts of the eye and ears.


Step 13: How to Draw a German Shepherd’s Facial Features
Here, we will need some white, brown, and light red. Start by adding some red to the tongue and adding a small streak of white on the side to highlight it. You can also use the white to create a small sparkle in the eyes and to brighten the teeth. For the final touch, color in your German Shepherd’s eye with brown.


Step 14: The Final Step to Finishing Your Realistic German Shepherd Drawing
In this very last step of the tutorial, we can finish off our drawing by removing the outline and then using our paint to add strokes of fur to trace over where the lines were. Remember to use the correct color associated with whichever area you are working on. We want to avoid a single solid outline, but rather have natural-looking fur.


Well done on finishing your tutorial on how to draw a German Shepherd! We trust that you have enjoyed the process of learning how to create a realistic German Shepherd drawing, step by step. Do not feel discouraged if your sketch doesn’t look exactly the same as ours – it takes practice to get all the dimensions right. But until then, enjoy the experience of learning something new!
Frequently Asked Questions
What Is the Hardest Part of Learning How to Draw a German Shepherd?
For the most part, this tutorial is quite easy and straightforward. The face and fur of a German Shepherd drawing are probably the most time-consuming due to the level of detail required to make them look realistic. However, by following this tutorial, you will find it simple enough to follow the steps needed to create a realistic German Shepherd sketch.
Can This Same Tutorial Be Used to Sketch Other Breeds of Dogs?
Yes, you can still apply the same set of guidelines to draw other types of dogs. However, each breed of dog is distinct, so you will want to make sure that you incorporate the correct proportions and angles applicable to the type of dog you want to draw.