How to Draw a Duck – Step-by-Step Tutorial for a Mallar Sketch
This post may contain affiliate links. We may earn a small commission from purchases made through them, at no additional cost to you.
So, you are looking for the perfect tutorial to teach you how to draw a duck. You have likely looked at tons of easy duck drawing guides online, but no luck. The good news is, you have finally stumbled across the right page! Duck drawing does not have to be tricky when you have the perfect how-to-draw guide at your disposal. Perhaps you are drawing a duck as part of a nature scene oil painting, or, maybe you need to add some ducks as part of a wall mural. Whatever your reasoning and no matter how much of a novice or advanced you may be, learning how to draw a duck with our guide will have you sketching the best drawings of a duck possible! Now, grab your art supplies, and let us get right to it!
Table of Contents
- 1 How to Draw a Duck Step by Step
- 1.1 Your Duck Sketch Construction Lines
- 1.2 Step 1: The Main Body of your Duck
- 1.3 Step 2: Drawing the Duck’s Wing Base
- 1.4 Step 3: Placement of your Duck’s Head
- 1.5 Step 4: The Beak of your Duck
- 1.6 Step 5: Draw a Neckline Connecting Head to Body
- 1.7 Step 6: Drawing your Duck’s Feet and Legs
- 1.8 Step 7: The Tail of your Duck
- 1.9 Step 8: Your Duck Drawing’s Final Outline
- 1.10 Step 9: Creating Feather Detailing on your Duck
- 1.11 Step 10: Coloring in Your Duck Drawing
- 1.12 Step 11: The Second Layer of Color
- 1.13 Step 12: Coloring your Duck’s Head
- 1.14 Step 13: Coloring your Duck’s Beak and Feet
- 1.15 Step 14: Highlights and Shading of Your Duck Sketch
- 1.16 Step 15: Final Touches on your Complete Duck Drawing
- 2 Frequently Asked Questions
How to Draw a Duck Step by Step
With our step-by-step guide to follow, you will soon have a beautiful and realistic duck drawing right in front of you, complete with vibrant colors and texture. Of course, there are plenty of different kinds of ducks out there, and each of those ducks has their own special and unique colors. An all-time favorite and well-known breed of duck is the Mallard. These beautiful birds can not be missed, thanks to their bright yellow beaks and eye-catching green and blue heads!
Like we said before, this simple, yet informative easy duck drawing guide can be used by absolutely anyone, no matter their level of drawing skill. Not only that, but you can create this duck sketch for so many different mediums! You could create this duck drawing on a drawing tablet, with acrylic paint, or even on a wall! Ready to get drawing? Good!


Your Duck Sketch Construction Lines
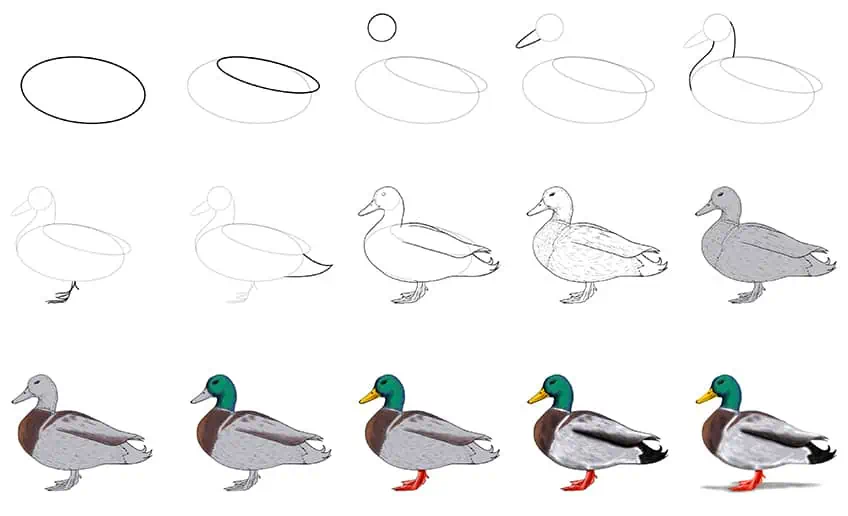
Now, before we jump into the step-by-step duck sketch guide, have a look at these drawings of ducks. This image shows you all the steps you can expect to follow as you learn how to draw a duck. The most important part of this entire easy duck drawing tutorial is the construction lines within your duck drawing.
As with every single one of our awesome animal drawing tutorials, the very first thing you will need are the foundations, or, construction lines. Shape lines will undoubtedly keep your duck drawing in proper proportion and will help take so much of the guesswork out. Have a look at the drawings of ducks below which show this tutorial’s breakdown. As you can see, up to step seven is all about the construction lines, which goes to show how important they really are!

Step 1: The Main Body of your Duck
The first step to easy duck drawing is your very first construction lines or shape. For the first shape, you will need to draw a slightly sloped, large oval. The left-hand side of the oval will need to be a little bit higher than the right-hand side. This is because the body of a duck has a slight slope to it. If you are using pencils, rather than a drawing tablet, make sure these lines are quite faint, so do not press too hard, you will want to erase these lines later on. Make sure that your duck drawing oval is in the center of the page, allowing for lots of space all around for the rest of your duck’s body parts.


Step 2: Drawing the Duck’s Wing Base
The oval shape is the most used and most popular of all construction shapes. Your duck sketch is now going to need a wing base, and this is another oval! Make this oval more narrow, it should also overlap your duck drawings’ main construction line circle quite a bit. Remember, your duck’s wing will stick out a little bit above its tail, make sure you draw the end of the wings construction circle ever so slightly extended past your duck’s body construction line oval.


Step 3: Placement of your Duck’s Head
Most ducks, such as your mallard duck sketch, have short necks. You will not want your ducks head to be too high above its body. Ducks also have particularly rounded heads. Look at the point on your duck main body oval where its wing starts to overlap, just above this point, you will draw a small circle shape to create your easy duck drawings head construction line.


Step 4: The Beak of your Duck
The fourth step is a quick and simple one. Draw an elongated “U” shape to create the duck’s beak. The beak of your duck should face in a slightly downward position from the front of the duck’s head.


Step 5: Draw a Neckline Connecting Head to Body
Once you have completed step five of how to draw a duck, you will notice that your duck’s final form is really starting to take shape. Begin by connecting your duck drawing’s body to its head. You will need to draw two lines, each line should be smooth and seamless. When creating your first line, start at the bottom of your duck head construction circle. Then you will need to draw a line that curves back and then around the front of the main body oval. For the second neckline, you will create a curved line from the back of the head, going down onto the duck’s body oval.


Step 6: Drawing your Duck’s Feet and Legs
It is time for the sixth step in your easy duck drawing. This is where you will be adding the duck’s legs and feet. All you need are some simple, single lines to help plan their placement. As mentioned earlier in this how-to-draw a duck article, we mentioned how most construction lines used will be circular or other shapes, however, for the legs and feet they are not.


The legs and feet of your duck drawing will be more free-formed. Around the midpoint of your duck’s main body, on the underside, you can create two separate lines for the legs. These lines will flow both downward and forwards. Your duck will also need three toes per foot, these can be drawn at the end of the lines. Remember perspective! The leg of your duck which is on the far side will naturally be slightly shorter because the leg is further away.
Step 7: The Tail of your Duck
The tail of a duck has a sharp point, you will notice this when looking at a real live duck as well as in drawings of ducks. The shape is almost iconic. Again, this step in your duck sketch is very simple. Start your tail line at the point of intersection between the main body and wing at the back of the duck, create a small and curved tail shape that ends on the bottom side of the main body oval. Remember the sharp point!


Step 8: Your Duck Drawing’s Final Outline
We are nearly at the end of our duck sketch guide! You will now be creating your duck’s final outline. Using the construction lines of your duck that you have made, you can now outline your duck drawing. This includes your duck’s head and body, its wings, and even some of your duck’s facial features.
Starting with the duck’s head, make sure you outline and follow your construction lines closely and accurately. You can add a little curved line on the base of the beak. This will help show separation from the rest of your duck drawing’s head. You can also draw a line to show the separation of the top and the bottom halves of the beak. Remember, ducks also have nostrils, so draw a small one near the top of the beak, where it meets the head. You can also draw a circle for your duck’s eye.


Now, onto your duck’s wings. You can dip your outline slightly below the construction shape, adding a few points at the end and a line at the top. For your easy duck drawing’s tail, add some character with some additional feather flicks. Your center point for your outline is easy to find, just use the construction lines you created for the duck’s legs. Do not forget your duck’s feet! It will need a few curved lines between the feet to create the webbing. Complete each foot with tiny little claw details on each toe.
Step 9: Creating Feather Detailing on your Duck
Textural lines and dots are how you will achieve realistic feathers on your easy duck drawing. First, you will start by adding some detailing to your duck’s beak. This includes a few small lines in the bottom area of the beak. Add some color to the duck’s nostril, as well as a little shadow on the very tip. Now, onto the head of your duck drawing! By using various dots and lines you will create shadows where they would naturally occur. At the same time, you can also add color now to the eye of your duck, and a bit of shading around this area too. Remember to follow the shape of your duck’s body in order to make it seem more realistic.


It is now time to focus on your duck drawing’s body. Using a line of smaller lines, you are able to create separation between your duck’s chest and the rest of his body. Remember to keep the feather lines on the chest flowing downwards and curving with the natural shape of your duck. When you get to the wings and other parts of your duck’s body you can use slightly longer lines, but, still following the shape of your duck in a natural fashion. Both the duck’s feet and legs can remain blank at this stage.
Step 10: Coloring in Your Duck Drawing
As you already know, the Mallard duck has very distinguishable features, unlike other ducks, they are so beautifully and vividly colored! Making them even more fun to color in! As with all drawings, you will want to build up the color using different shades and at a gradual pace. The very first color you will need to use is light grey. Color in your whole duck body with this shade.


Step 11: The Second Layer of Color
The next color in your toolbox will be a light brown shade. As can be seen in the example image below, You will be applying two layers of this lighter brown in two areas of your duck. You should select a medium-sized brush for your duck’s breast area, the top of your duck drawings back, and some on the bottom of its wing. Remember, your duck sketches chest should have the lightest shade of brown compared to the rest. To achieve this result, all you will need to do is add another layer of your light brown shade to all the same areas of your duck, excluding the chest.


Step 12: Coloring your Duck’s Head
There are two different colors that you are going to use in this step to create the signature iridescent green head. These two shades are light green and cool purple. Begin by coloring the whole head with your light green shade. Then, you can go in with a soft brush and blend the purple paint into the green all around the edges of the head. Use an inward motion to blend the two shades together. Focus quite a lot of purple just below the head in the crook of the neck. Shadow will naturally lie in this area and purple is a wonderful shading color.


Step 13: Coloring your Duck’s Beak and Feet
Begin this step with a yellow shade and color the entire beak. You can then use a light brown shade to add shadow and contouring to the beak. For the duck’s feet, find a reddish-orange shade and color the feet completely. You can finish the feet by adding a second layer of white highlight on the front sides of the legs and feet.


Step 14: Highlights and Shading of Your Duck Sketch
Highlights and shadows are essential for creating realistic coloring and dimensions. Begin the highlighting by using a shade of white to add dabs of light throughout the main body of the duck. Make sure that your brush strokes follow the textural lines for additional realism. You can also add white highlights to the neck and add a little glint in the duck’s eye. For the shading, use a soft brush to add a light layer of black paint to the bottom of the wing, around the bottom of the duck’s belly, and the whole tail.


Step 15: Final Touches on your Complete Duck Drawing
While this step is not a compulsory one, it will definitely help ensure that your duck drawing is more realistic and more seamless. This is removing the outlines. The most efficient way to achieve this is by tracing over them with corresponding colors. This step will also apply for your textural lines, but for these, trace over them with your gray and light brown.


And, there you have it! A beautiful, realistic Mallard duck drawing! Hopefully, this tutorial has helped you achieve exactly what you were after, and you are happy with your duck drawing. We encourage you to keep practicing and even trying some other breeds of ducks with different coloring to keep things interesting!
Frequently Asked Questions
How Do You Realistically Color in a Duck Drawing?
Every type of duck has its own unique and beautiful colors. In our how to draw a duck tutorial you will learn everything you need to equip yourself with the know-how of creating a realistic duck sketch.
Is It Hard to Learn How to Draw a Duck Realistically?
While it may seem that all the feathers and textures make drawing a duck difficult, Just a few, simple to follow steps will help you along your way and soon you will have easy duck drawing under your belt. No matter your artistic level be it novice or pro, our guide will help you learn how to draw a realistic duck in no time at all!