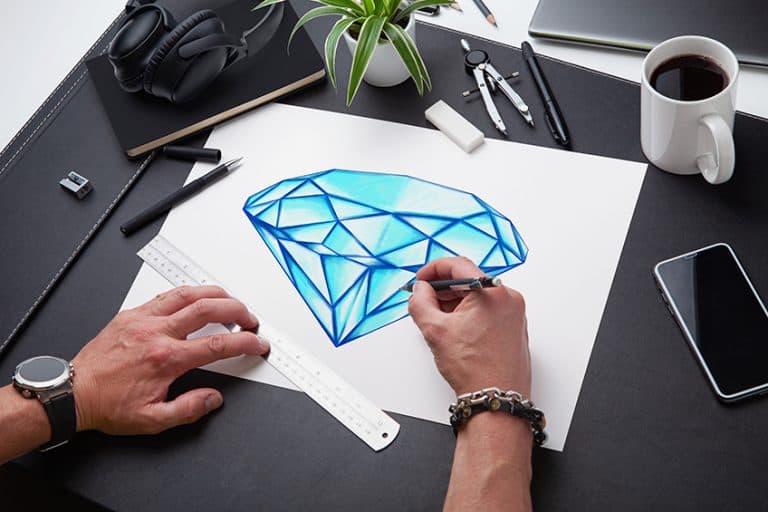
How to Draw Animals – Instructions for Easy Drawings of Animals
This post may contain affiliate links. We may earn a small commission from purchases made through them, at no additional cost to you.
Drawing animals can be a serious challenge and cause of frustration for all kinds of artists. Once you know the right approach, however, it’s not that difficult to learn to draw animals. All you need are the right materials, some practice, and a lot of patience. In this step by step animals drawing guide, we will show you the best techniques on how to draw animals. We have made animal drawing easy by providing illustrated steps throughout the way. We hope you have fun learning how to draw animals!
Table of Contents
Our Tutorials on How to Draw Animals
We have created a lot of in-depth tutorials on how to draw different animals. Here you can find an overview of our how-to’s. If you are searching for more general guidance, keep on reading this massive blog post about animal painting.
Materials Needed for Getting Started
Do you want to learn how to draw animals, improve quickly and achieve great results? Then you will need the right materials and the best equipment. Many people underestimate just how much the material influences the drawing feeling, result and progress. A design can look bad with the wrong equipment, even though your skills would allow a completely different result. To remove this problem and avoid frustration, you should not skimp on the material.
Good paper and good pencils do half the work for you, allowing you to progress much faster and preventing you from losing the joy of drawing right away.
Mechanical Pencil
Before each drawing comes the sketch. To avoid damaging the paper and to be able to easily remove the lines afterwards, you should choose the right pencil. I recommend mechanical pencils, because the tips of these are always a little rounded and therefore cannot dig into the paper. Ordinary pencil tips often leave small scratches that only show up later when you color in the drawing. These can hardly be concealed.
Mechanical pencils prevent this and are very practical. Another advantage: If you press too hard, they break. They teach you to draw the lines gently and with feeling. Which one you choose is up to you. The only important thing is the thickness. Choose a line thickness of 0.5 mm and a hardness of 2B. For softer and thicker lines a line width of 0.7 mm is recommended, for fine and dark lines 0.3 mm. The Pentel refills are good and inexpensive.


Colored Pencils for Drawing Animals
Next to hit the paper are colored pencils. These are your most important drawing tool and are more than just a colored lead in a piece of wood. Good pencils have a high pigment concentration, a solid lead with good drawing properties, and a stable barrel. Without good colored pencils, you cannot draw good pictures. So if you want to draw regularly, there’s no getting around the investment. There are only a few colored pencils on the market that meet the requirements of professional drawing. This makes the decision easier for you.
You can choose between oil-based and wax-based colored pencils. The oil-based ones are harder, can be sharpened well, and allow thee finest details. This is especially advantageous for coats and hair for easy to draw animals. Wax-based red pencils are softer, can be blended beautifully, and are perfect for surfaces like eyes, flowers, or backgrounds. It is advisable to have both types, but this is not a must. Just test them to see which one you can handle best. But if you draw fur, you are well-advised to use oil-based crayons, because they make work easier – especially for beginners.
Best Colored Pencils to Make Animal Drawings Easy
The best-known brands are the Faber-Castell Polychromos. The range includes 120 colors and offers a piece of solid basic equipment. Almost anything can be done with the Polychromos set, and they offer the best value for money. This is especially useful if you want to learn how to draw animals or start drawing in general.
Equal in quality are the Caran d’Ache Pablo set which also has 120 colors. However, for those who need skin tones, the color palette of both sets is disappointing. These pencils are great for learning how to draw animals thanks to their quality leads, vivid pigmentation, and strong color lightfastness. You can also easily blend colors to achieve different tones.
The wax-based Prismacolor Premier has an amazing palette with its 150 colors. They offer the perfect complement to the polychromes and are a very useful product when it comes to drawing eyes. Eyes drawn with Prismacolor have a stunning effect, which cannot be achieved in this way with oil-based crayons. The large 150 box is also very affordable.
The luxury variant among the wax-based crayons is the Caran d’Ache Luminance. They are of higher quality, more stable, and much richer in pigment. However, they are also more expensive. The set includes 76 colors which are more suitable for more experienced illustrators. Some people prefer to use the Luminance set than the Prismacolor. The best thing is to just try them out. If you draw eyes, you need a covering blue every now and then for a better effect. It is recommendable to get at least the Light Blue 161 of Luminance for this purpose.
A great addition to any set are the Derwent Lightfast pencils. These are also oil-based colored pencils like the Polychromos set. However, they are more similar to the Luminance in their drawing characteristics and can be layered like wax-based crayons. They are virtually a perfect mixture of both types of colored pencils and have interesting shades of color that show exciting nuances after being faced with white. And unlike wax-based crayons, they can be erased. Polychromos do not replace them, they are too soft for that, but they are at least as good as Luminance, but only slightly cheaper than the latter. None the less, they are a great addition.
Tip: Prismacolor Premier offers the best white of all these colored pencils. Even if you don’t use this brand, at least buy the white, it’s worth it.
Sharpener
A good sharpener should be able to sharpen your pencils properly without making the lead brittle or angular. There is a choice between hand sharpeners and crank sharpeners. Which variant you prefer is a matter of taste. I personally prefer the classic hand sharpeners. They allow better control and the sharpening is very fast. But if you are a friend of crank sharpeners, a sharpener from Dahle is the right choice. It is also suitable for pastel pencils, where hand sharpeners can have problems.
There is no real all-rounder when it comes to hand sharpeners. Every brand of colored pencil is sharpened perfectly with a different sharpener. The Cretacolor hand sharpener is best for Prismacolor, but it also becomes blunt quickly, which is why you have to change it more often. With this one also gets Polychromos, Luminance and Lightfast sharp. But the loose metal double sharpener from Faber-Castell is better suited for these, as its large opening can be used for the thicker Luminance and Lightfast.


Paper
Nothing is underestimated in drawing as much as the paper. Even the best pencils are of no use if they cannot develop their potential. But there are so many different types of paper that it is difficult to choose the right one. Be sure to avoid the sketching paper that beginners love to use. Sketch papers are intended and developed for sketches, not for real drawings. They inevitably set limits that you cannot overcome with any skill, no matter how good you are. At a certain point, further development no longer takes place, because inferior or wrong papers do not allow this.
For quality pictures, there are drawing papers with individual characteristics. These can be smooth or rough, allowing grained or closed lines, and hard or soft strokes. If you draw animals, you should use paper that is smooth and resistant and allows multiple layers of color. It is important that a paper is able to absorb these, because only then can realistic effects be created. Never skimp on paper, it will inevitably take its revenge. Once you have tested a good drawing paper, you will know what I mean.
The best papers on the market are the Hahnemühle Cézanne and the Strathmore Bristol Smooth Series 300. Watch out: There’s also the Bristol Plate and Vellum. The former is a little smoother and produces harder lines than the Smooth, which is not optimal for fur, the latter is too rough. The Cézanne finish is in my eyes unmatched, but the Bristol Smooth comes very close to its characteristics and costs only half as much. So if you are afraid to spend a lot of money on drawing paper, the Strathmore Bristol Smooth is your first choice. There is no real alternative for either paper, as they offer you everything you need to draw optimally and make rapid progress. They set you no limits.
If you already have some drawing experience or just want to try it out, you can try the Strathmore Toned Tan/Toned Gray. This is a tinted, robust paper that has great properties, on which you can draw wonderful fur and on which wax-based crayons come into their own. It is the only sketching paper on the market that has the qualities of a drawing paper. But you have to enjoy it and know how to use it.
A good all-rounder is Hahnemühle Britannia. It provides a good base for colored pencils and watercolors. But be careful: the surface is more sensitive than with the more expensive papers and can therefore break more easily. For crayon drawings, however, it is an inexpensive alternative and is always preferable to many other papers.
For pictures that don’t require layers, such as comic-like drawings, a very smooth paper makes sense. With this, you can create rich, closed, and soft surfaces. For animal drawings and hair, however, such papers are generally unsuitable.
Tip: Leaves from glued blocks can be easily removed with the back of a butter knife.
Eraser
There are also big differences in the quality of erasers. An eraser should not be too hard and should not smear the pigments, but should absorb them without damaging the paper. There are a variety of great erasers that are particularly suited for colored pencils. A perfect all-around eraser should be optimally equipped to erase colored pencils and pencils. Also consider getting a small round eraser, for detailed areas, and a kneaded eraser for removing dust, pencil lines, and lightening color layers.
Even the best and gentlest eraser will attack the paper and inevitably change its properties, even if you only go over it for a short time. If you then erase too much and/or too firmly in one place, you can damage the paper, make drawing more difficult and, at worst, cause unrecoverable ink spots or even holes! Erase as little as possible. The Strathmore Toned Tan / Toned Gray is one of the few papers that allows multiple etchings without noticeably roughening or breaking.
Fan brush
Drawing inevitably generates dust, which must be constantly removed to avoid smudging and stains. Never wipe this off with your hand! Cosmetic brushes are not recommended either, as they are made to absorb and spread around powder. Expensive dust brushes are not necessary. A cheap and efficient variant is simple fan brushes, which are cheaply available. It doesn’t matter which one you choose, it just shouldn’t be too hard, otherwise, it will scratch too much over the sometimes sensitive paint spots.
Highlighter
Setting highlights, such as the light points in the eyes, is extremely important and cannot be done with colored pencils alone. The most common way to do this is to use gel pens or acrylic markers. The Copic Opaque White is more suitable here. This is available in a small version with a brush and a big one without a brush. It has great shining white color, can be applied with a brush, dries very fast and the best: it can be easily scratched off the picture. This is not possible with acrylic markers or gel pens.


Light Table
Do you work with grids or draw the baselines freehand? This is time-consuming and can be very frustrating. There is no shame in using a light table to transfer the baselines to paper! This doesn’t make the drawing any less art-worthy, because the coloration is the real work and a light table can’t do it for you. So if you want to save time and have absolutely exact proportions, use this valuable tool. The minimum size should be A3. You can build it cheaply yourself or buy a finished light table. An ordinary glass table under which you place a bright lamp is also sufficient. If you are afraid that the drawing might slip while you are tracing, use a removable tape. Tape fixes your drawing gently even for days and can be removed without leaving any residue.
Tracing Paper
Transfer paper is an alternative to a light table, but less accurate than one and the graphite lines cannot be removed nicely. With white paper, you should therefore prefer a light table. Tinted or thick paper often does not allow light to penetrate it sufficiently. For these cases, special tracing paper is the first choice.
Daylight Lamp
Anyone who draws more often will quickly become annoyed by the dependence on daylight and the falsified colors under artificial light or that of the morning and evening hours. If you want to work independently of daylight, a daylight lamp with a color temperature of 5500 Kelvin is recommended, because this is the closest to daylight. As these often emit UV radiation, you should be careful to choose a lamp that doesn’t do this so as not to damage your skin and eyes. For a ceiling lamp, it should be at least 12 Watts. Under this light, the colors appear clear and natural.
Before You Start Drawing Animals
Now that you have all of the right equipment, it’s time to learn how to draw animals. Before starting our how to draw animals step by step guide though, you will need to get the first basic steps done.
The Right Underlay
Drawings are extremely sensitive when coloring. Even the most inconspicuous crumb or the slightest unevenness will squeeze through. It is often difficult to conceal. Choose an absolutely smooth, clean, and firm base. Glass is best suited for this. Never put your drawing hand on the sheet to avoid smudging. There are special drawing gloves, but the easiest way is to use a simple piece of paper that you slip underneath your hand to protect the image.
The best is a slanted base that creates a 90° angle to your eyes. This way you avoid crooked drawings.


Suitable Design Selection
Many people make the mistake of trying to work from overly difficult, or simply bad originals. If you want to learn to draw, use well exposed, sharp, simple subjects. You do not have to prove anything to anyone. It only leads to frustration if the pattern is too heavy and details and colors are not clearly visible. Be realistic. What can you do, where else do you have problems? Do you know how to draw white fur? Do you really think you can draw a shaggy dog? Can you compensate for blurring on the original with experience?
Tip: A tiger is one of the best easy animals to draw. It is fairly basic to draw and forgives mistakes and inaccuracies. At the same time you can easily practice coat structures and patience. Also leopards and animals with short fur and without complicated colour patterns are well suited as easy to draw animals.
Select the Design Size
The second most common mistake after the choice of design is the motif size. Many choose it too small. Only those who are experienced can manage to get the finest details on a size like A5 or smaller. A4 can also be too small for a full-body portrait, but it is quite sufficient for a head portrait. A3 is usually a good size to make your work easier. The smaller the subject, the less detail you can get, so always remember that. If you notice that you can’t get the lines fine enough, draw the subject larger, then you have enough space and save yourself the frustration.
Plenty of Patience
If you want to draw animals realistically and learn to draw them in general, you need one thing above all: patience. A simple animal portrait without background usually devours from 25 hours upwards. On average it takes 40 to 60 hours to draw it, depending on the format and degree of realism! There is no shortcut.
Good coat, good skin and good feathers require fine work and a lot of time. You should be aware of this when learning how to draw animals. You cannot draw a good coat in two hours. The more time you take, the better the result.


How to Draw Animals Step by Step
That’s a lot of preparation, isn’t it? But now that you have everything, you’re all set and ready to go. Here is our step by step animal drawings guide to follow for anyone wanting to learn to draw animals. Take the steps slow and enjoy the process, and you will see that learning how to draw animals is not too difficult.
The first step is to transfer the motif onto your paper with a mechanical pencil without pressing too hard. After all, you want to be able to remove the lines without leaving any residue. The best way to do this is to use a plasticine rubber. This is gentle on the paper and allows you to control exactly how much of the lines are erased. You will still need to see a small amount of them.
Make sure you always keep your pencils sharp when drawing. In the end, you will end up with half the pencil lying next to you in the form of shavings, but your picture will be much more detailed. Only rarely is a blunt lead more advantageous.
Step 1 in Drawing Animals – Drawing the Eyes
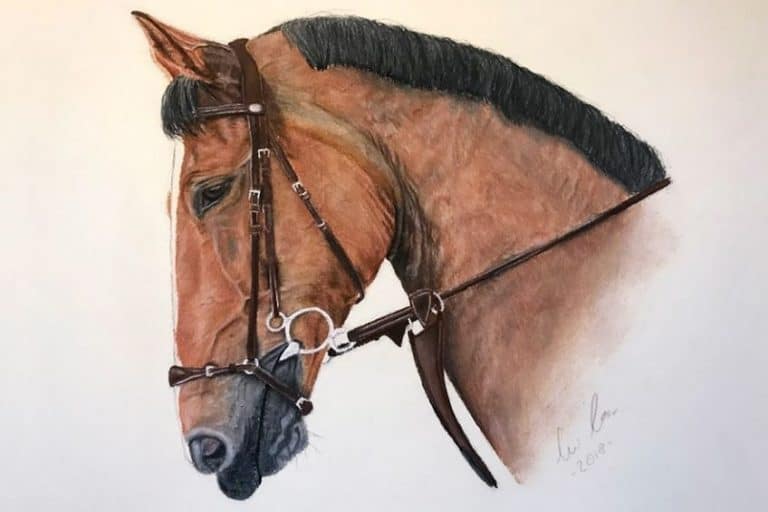
I’ll show you the whole process from a cat drawing. Cats are pretty good easy animals to draw for beginners. Start with the eyes. They are the easiest to draw and are a focal point for many drawings. They also provide a fixed point from which the next steps become easier. For the eyes, it is best to use wax-based crayons. They can give eyes a great effect. In this example, I use the Prismacolor Premier. Of course, you can also use oil-based colored pencils like Polychromos.
For eyes as well as for the coat: There is usually a basic tone on which all other colors are based and applied. Take a close look at which basic tone the eyes have. In this case, it is yellow (Cream PC914). At the edges, you can still see soft green (Grey Green Light PC289), which is the secondary color. This lets you create gradations in the form of similar and differently colored bright tones, depending on the motif, to create more vividness. For this purpose, a darker green (Pale Sage PC1089) and an even darker one (Sap Green Light PC120), and white (White PC938) are used.
I also have the basic colors Polychromos-Black (Black 199 (because it is more precise than wax-based crayons), the Luminance Blue (Light Blue 161 (alternative: Prismacolor Caribbean Sea PC1103)), and the Copic Opaque White ready.
1 – First paint the eyes with the basic tone, up to the pupil.


2 – With the black Polychromos (shouldn’t be too sharp, otherwise you’ll scratch the paper) you can color the pupil. Then with a well-sharpened lead, you can slowly and carefully border the eye so that you can see exactly where the edges are for the next steps. It serves as an aid, so it does not have to be worked out exactly yet. To make sure that nothing smears, it is even advisable not to make this border strong, or even to remove it slightly with a kneading tool before you paint the inner and outer edges of the iris with the secondary tone (in this case the light green). Be careful not to get into the black.
3 – Do the same again with the first darker gradation (in this case: Pale Sage), but only in places and irregularly; you should not draw it completely. Paint over these darker areas again with a lighter tone. Do not press down so hard that they disappear again. They should still be visible and form a harmonious unit with the rest.
The middle must remain in the main shade (in this case yellow) and may become very narrow. With this, you follow this stripe and widen it again, but in a jagged manner, whereby the main shade may be drawn right to the edge of the iris and pupil in places. This creates natural-looking shapes. You can also hint at the eyelids, this makes the eye more alive when drawing. Finally, draw a narrow white line in the light center of the iris, this increases the contrast and makes the iris glow.


4 – An eye appears particularly lively if it has a shadow at the upper edge of the iris. Even with an image that does not have one, it can be useful to add at least a small one. Use the pointed polychromatic black for this, because it creates more even areas. Move it carefully in a slight arc from one end of the iris to the other (never draw a demarcation line before, you can see that!) Only press it on very lightly and proceed slowly, otherwise, it can quickly become too dark and uneven. If you have come too deep or if it has become too dark, you can lighten the black gently with the basic tone and push it back again.
The eye still looks quite dead. Only reflexes breathe life into it, whether this is seen in the original or not. The easiest way is to work with blue. Luminance covers best, but prismatic color or Polychromos are also possible. Take a dark blue and paint ovals in one or two places in the upper half of the iris and pupil. If the blue crosses both, it usually looks more natural. It doesn’t matter whether the blue areas are in shadow. They are placed where they fit best or as the template shows.
5 – A light blue is used to draw strongly over the dark one, but it should still be visible at the edges. Work in some special features, such as speckles in this case.

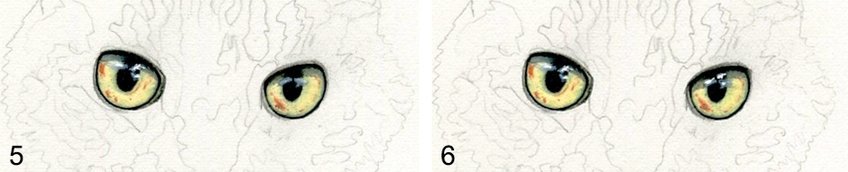
6 – Now comes the real magic, starting with the light spots. You can either leave them out from the beginning or add them at the very end, which is advisable in order to better estimate their size, number, and placement and not be disturbed by omissions when drawing the eye. Omissions and colored pencils alone would never get light points white enough, this is only possible with color. Copic Opaque White is especially white and can be processed optimally.
This is used to set the light points. Do not make them round. Eyes rarely have round light spots, as they usually reflect windows or the sky. Often they are rather triangular or square, sometimes irregular like clouds. There are bright and faint light reflections, but also small and large ones. In any case, you should put white color into blue and additionally at least one other place (at the upper edge) of the eye. Don’t make too many, this can quickly look overloaded, but also not too few, this might not create enough liveliness. Try to develop a feeling for the right measure.
7 – Actually, the iris and pupil would now be finished, but in the course of the creation process it may well be that some subtleties still need to be worked on. In this case, it makes sense to emphasize the darkness of the green. For this purpose, an even darker gradation is used (Sap Green Light (black is also suitable)). Using this, one paints over the existing tone only in places and very jaggedly, which strengthens the iris structure.
Generally speaking, contrasts create liveliness. Dare to use very light and very dark tones such as white or black where you would not use them.


8 – The eyelids are still missing to emphasize the aforementioned liveliness. In this case, only the lower one is visible, the upper one is hidden under the black. But the principle would remain the same. Border the iris strongly with a pointed black. Caution: The mine can break easily. Proceed with care. So that it doesn’t look like a line, you should let it run out softly by drawing minimally into the iris along the entire lower lid edge, thus creating a very light shadow. This shadow is hardly visible, but it works. The second line, which marks the transition from the eyelid to fur, should also be soft (on the upper and lower eyelid alike), by placing tiny lines so that it has a fur-like structure.
9 – An eyelid is usually wider at the edges than in the middle. In animals like this cat, the lower eyelid runs out bright.
10 – Darken the eyelid strip with black. Now pick up a white (an oil-based one like Polychromos is recommended for precision), follow it, and interrupt the black line towards the nose. The white mixes with the black and creates a bluish-grey tone that is more natural and softer than pure omission. Widen the severed line with black so that the upper and lower eyelids are clearly separated.


Step 2 in Drawing Animals – Drawing the Fur
Animal coats require a lot of patience and tact. You have to set practically every hair individually. There is no universal technique. Every artist has their own, but realistic images are generally created by layering. It is worked with several layers of paint and from light to dark. As a beginner, one makes the mistake of wanting to draw fur with only one layer. But the fur of an animal varies in length and texture and is full of color gradations, patterns, and reflections. Through layers, these can be controlled and used specifically.
Coats need fine lines, which can be better created with oil-based, i.e. harder pencils. The Polychromos are perfectly suited for this.
Like the eyes, an animal usually has a basic tone. In this case, it is brown (Nougat 178). If you look closely, it is below the grey and can be clearly seen in some places (e.g. nose). Grey (Warm Grey V 274) is the secondary color, in the case of the eye, it was green. The first darker gradation would be a very similar or the same tone in dark (in this case Warm Grey VI 275). With black, this is intensified. Practitioners can skip the first dark gradation and directly use the darkest color (in this case it is black, in other motifs it can be another color).
Fur and eyes usually consist of four to six layers of paint, with some artists using more or less. In general, however, black is the tip when it comes to contrast enhancement and shading, even if the animal has light fur on the original. Do not be shy to work with it. Used carefully, you can darken any color with it and increase the depth of color. Rich colors and clear contrasts make a drawing vivid.


11 – Start with the nose. Like the eyes, it is a fixed point and makes it easier for you to draw the coat. There is no universal rule for these. It should only have light and dark parts to show ups and downs and the incoming light. The light areas can be enhanced with white, the dark areas with black. Do not choose pink, that would look unnatural, but rather flesh colors. As with the eyelids, use a dash to gently taper the edges. After this, the coat is on. Set the first layer with a well-sharpened pencil, which must be sharpened very often. Only then the lines become fine and closed.
The first layer should always be light, as it is used to indicate the different growth directions and hair lengths. If in doubt, it is better to trace darker again rather than starting too dark, because you should avoid etching if possible to avoid damaging the paper. Be careful not to draw this first layer of hair or color flush, so leave enough space between the individual hairs. This distance will always cause the layer underneath to flash through, which makes a coat look natural in the end.
Important for all layers are growth direction, hair length, and hair growth density. On the bridge of the nose, the hairs are fine and dense, above the eye rims, they are long and sparse, which makes the skin appear. In animals like this cat, the hairs point away from the eye, in the middle, they point to the nose and fan out there. Towards the forehead they lean towards each other and meet, to run relatively parallel again further up. You should pay close attention to these courses from the first layer of paint on. They will still be visible even in the very last layer if you put them in the wrong way.
Never draw hair symmetrically, equally long and equally thick, and never draw it carefully and exactly. Rather draw quickly from the wrist. If you set the hairs quickly, the desired irregular structures will appear all by themselves. Otherwise it takes time and does not look natural.

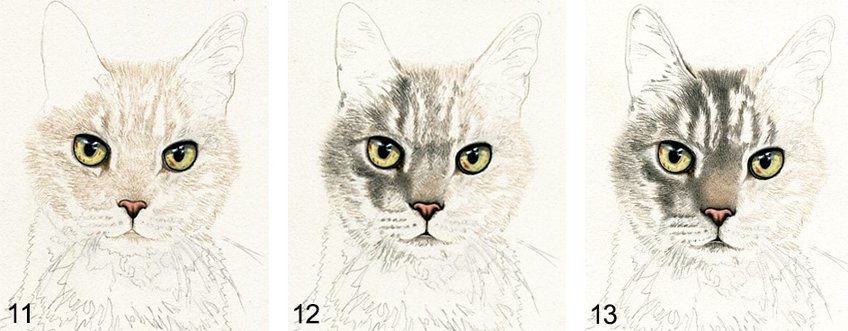
12 – When the first layer is drawn, the secondary color comes in. With single-colored animals, either the same color tone would be applied again, but stronger. Otherwise, a darker and/or very similar one. In this cat, it is a different color, grey. This is now set with the same principle as layer one. Leave enough space between the single strokes. The brown is still visible. The stronger the brown is drawn, the more clearly it comes out later.
13 – Since paint layer one is primarily an aid or marker, areas such as the nose are reworked in the following paint layers. In this case, the brown is intensified in the right places. Pay attention to the condition of the hair. This is so small and dense on the bridge of the nose that you don’t even have to put any or hardly any lines, but can simply paint the area closed. But always do this very slowly and with a well-sharpened pencil, otherwise, it becomes unnatural. For some parts of the coat, like the paws, areas make more sense than strokes. Weigh up, when which technique is the most sensible.
This step makes it clear what is generally important when drawing: the approach. Always work carefully from light to dark. The grey will be drawn more strongly again, until the strength is right.
By the way, it is always advisable to finish your steps in one go. So don’t draw one half of your face completely finished and then devote yourself to the other, otherwise, it is easy to forget or do something different and parts of your picture will look too different. There are artists who work their way up, piece by piece, but they are very experienced and know exactly what they are doing.
14 – Cover the entire face with the secondary color. If the base tone is too weak in some areas, strengthen it in this second layer. Reworking is quite normal. Nothing is perfect right away. With a kneading eraser, you can also lighten individual areas softly. In this case, the brown of the bridge of the nose was reduced by such an eraser to make it look more natural.
The cat has white patches of hair. It is difficult to draw a white coat, but the basic principle makes it easy, because it is never a solid colored area, but interspersed with shades of color, dark spots, and a coat-like structure. For white coats, you can almost always use the color Cold Grey II. Draw lines through it with enough distance between each other, so that it looks like fur. The white flashes through and prevents that it appears grey.
If white parts of the coat are in the shade, press firmly and colo]r the areas flat (except for the edges towards the light). If in doubt choose a darker cold grey. Experienced artists can also use a highly pointed black pencil to set the lines and shadows. These will then stand out more clearly (see the step after next). Depending on the part of the coat this may even make more sense. But Cold Grey II is usually the base color for a white coat, with which you cannot go wrong.
It can also be useful to add another color in addition to this grey, in this case, it would be brown (see muzzle in the next step). Such colo=r influences make a coat look more lively.


15 – Now comes the dark gradation. The principle is the same as before: place dashes with a distance between them. If you do not use high-quality drawing paper, it can quickly become too dark and strong. It is better to start lighter or to proceed carefully. The advantage of high-quality drawing paper is that its texture prevents overly dark lines and forces you to get darker step by step.
This is because it does not immediately absorb ink in full strength. With this (penultimate) layer of paint, areas that still need to be reworked become particularly visible. Here and there, for example, the brown is intensified.
The temples of a cat have hardly any hairs and should only be covered sparsely with these. The skin tone flashes through in these places and is the same as in the ears. These should be drawn from this step on at the latest. You can also draw them much earlier.
Since they are not a fixed point, it does not matter too much. The ears are drawn like the nose with a lighter and a darker tone (never use pink here either) and the dark is intensified with black, for example. Always leave out ear hairs. Since they are not as white as whiskers, it would look unnatural to add them afterward. The hair in the ears is difficult to draw and requires some patience. They should be pulled irregularly and be of different lengths.
16 – Continue to cover the face with the dark gradation and use black to enhance it and maximize contrast.


17 – Once all of the layers are in place, the finer points are revealed. Places are darkened (for example, ears, and nose) or lightened. Colors are intensified (for example, the brown in the white coat) or minimized, and proportions are adjusted (for example, the width of the face and texture of the mouth) until it matches the original.
Such detailed work always comes right at the end, because only then you can see where little things are missing or need to be repaired. Don’t stick too strictly to the pattern, it is only meant to help you and does not have to be transferred perfectly to the sheet. A drawn picture is not a photo but develops its own effect, and this effect should be harmonious – that’s the most important thing.
18 – Fur can also be drawn more briskly. Where you should be more careful with the face, the body can be quicker, if it allows it. If the face and body are more or less the same, as in a rabbit, it is not recommended. In this case, the cat’s body coat is quite wild and much longer than the face. This allows a different approach. Here it is sufficient to work with the basic tone, the secondary color, and a single dark gradation. The darkest in this case is black. So there are only three layers. But the principle is transferable to other animals and skins.


First, draw the entire coat with the main shade. With very wild coats, it works better if some parts are more closed up than others (see detail pictures). Draw the strokes briskly and always from the tip of the hair towards the hairline. This makes the hair areas more even. Also, pay attention to the length of the coat and the direction of hair growth.
19 – Once the base tone is set, draw with the secondary color completely over the underlying layer, but of course with the same irregular stroke. The basic tone will inevitably come through. With solid colored animals, the lighter shade would simply flash through and make the coat look more alive.

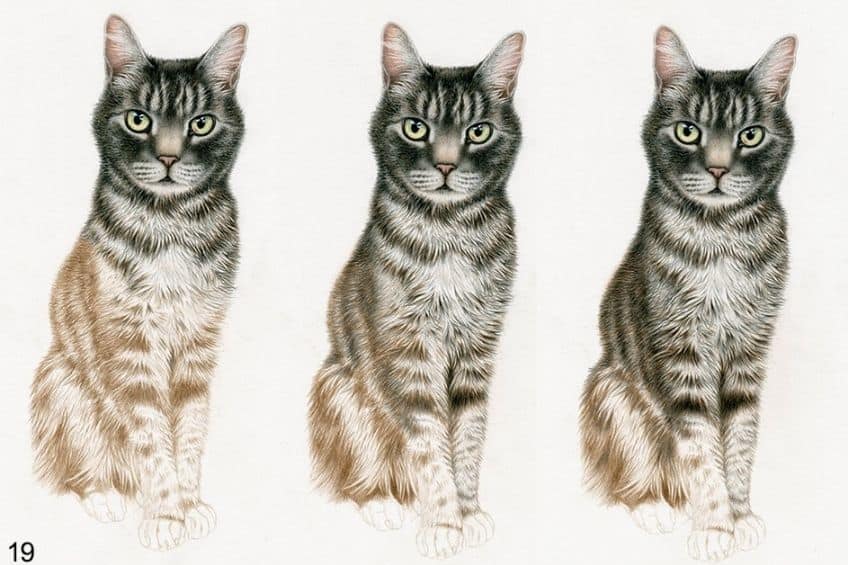
Finally, the same dark gradation is used as the face dictates. Whether this is black or any other color is irrelevant as long as the shades are the same. With this last color, you can work on the other layers until everything is right.
With the white coat portions, it becomes clear that it is also possible to set isolated strokes with black without endangering the white. To the viewer, it looks fur-like and natural. Never forget that a picture, whether drawing or painting, is viewed from a distance, not from close up. The effect at a distance, i.e. that of the outside observer, must be right.


20 – What is still missing is a shadow on the floor, which gives the animal a particularly lively effect. Set it carefully with different gradations of cold grey or pencils, don’t forget the dark core shadow. Rather look at the computer first to see where exactly it has to be placed. It never hurts to take a photo while drawing, to look at the picture on the computer, and to try out certain things in a program before you put them on the sheet and thus possibly ruin your drawing.
Stop here, the whiskers are still missing! A cat has whiskers all over its body, but they are especially visible above the eyes and of course on the muzzle. These can be added to the picture by omitting or scraping the color with a scalpel, but the easiest and most effective way is with Copic Opaque White. Quickly pull the small brush. If you want to use an external brush, reach for a tractor brush. It has an extra-long tip, which is perfect for long fine lines.
Your Animal Drawing is Ready
Your drawing is now complete. It wasn’t really that hard, was it? Drawing animals just requires the right materials and techniques as well as sensitivity and a lot of patience. But most of all, practice. No master simply falls from the sky and you shouldn’t expect to do things perfectly right away. Every artist started with stick figures and no one could draw well straight away. Take the pressure off in trying to do it like someone who has been doing it (professionally) for years or decades. Just have fun, get better at your pace, and set realistic goals. The joy of art is the most important thing, you should not lose it and you should not let anything or anyone take it away from you.
With this in mind: have fun with your next drawing. I hope I was able to give you some useful advice, which will make it easier for you to put your designs on paper in the future and make animal drawings easy. This easy to draw animals guide may be detailed, but it should have covered all of the skills you will need for learning how to draw animals perfectly.


Madeleine Edsberger
Madeleine Edsberger (End of Horizon) lives in a small village in Lower Saxony and is a scientifically enthusiastic autodidact. From an early age, she was fascinated by pictures and writing and spent every free minute drawing, reading, and writing. After school, she took the artistic path due to adverse circumstances, learned the craft of writing in self-study, and since then has been working as a proofreader, occasionally as an editor, for novels. In 2016 she began to draw professionally for the first time and built up a further mainstay as a freelance artist. She loves to try things out and learn new things. There are a lot of things on her list that she still wants to teach herself. Her journey has only just begun and she is curious to see where she will go.