How to Draw a Goat – Another Easy Animal Drawing Tutorial
This post may contain affiliate links. We may earn a small commission from purchases made through them, at no additional cost to you.
Goats are naughty and lively critters that are among the farmyard’s most enjoyable creatures. Goats are easily identified by their rough hair, large shapely horns, and beard. Because the tiniest error may be noticed immediately, it might be tough to draw a realistic goat drawing with this characteristic style. Don’t let your fears to hold you back! In this guided lesson, we will walk you through all of the processes and offer you our best tips and methods for quickly creating life-like and easy goat drawings.
Table of Contents
- 1 How to Draw a Goat Quickly and Easily
- 1.1 Step 1: Creating the Main Body of Our Goat Drawing
- 1.2 Step 2: Creating the Head of the Goat
- 1.3 Step 3: Creating the Ear and Beard
- 1.4 Step 4: Creating the Goat’s Horns
- 1.5 Step 5: Connecting the Head and Body with a Neck
- 1.6 Step 6: Creating the Front Legs of the Goat Drawing
- 1.7 Step 7: Creating the Udder
- 1.8 Step 8: Creating the Back Legs and Tail
- 1.9 Step 9: Creating the Collar for the Goat
- 1.10 Step 10: Creating the Outline of Our Goat Drawing
- 1.11 Step 11: Including Texture Detailing
- 1.12 Step 12: Creating the First Color Layer
- 1.13 Step 13: Adding Black for the Shading
- 1.14 Step 14: Adding Color to the Details
- 1.15 Step 15: Layering More Detail Coloring
- 1.16 Step 16: Adding the Highlights and Shadows
- 1.17 Step 17: Adding the Final Touches
- 2 Frequently Asked Questions
How to Draw a Goat Quickly and Easily
The most difficult element about sketching animals such as a goat is deciding where to begin. If this is you, you’ve come to the right place. We will teach you how to lay down the outline of your goat drawing before adding features and color in our easy goat drawing lesson. As you can see in the lesson outline below, we start our goat drawings with a sequence of basic shapes. This building technique assists us in obtaining accurate measurements and ratios in our design.


There is a plethora of materials to choose from when creating your own goat drawings. You may simply follow this lesson on your sketching tablet if you are a visual designer. If you want to use pastel or paints, you may easily adapt the coloring stages to your preferences. With that said, collect your sketching tools, settle in, and let’s get started on the drawing instruction!


Step 1: Creating the Main Body of Our Goat Drawing
Usually, our drawing lessons start with an oval form to depict the major section of the creature’s body, but for our goat we’re starting with a huge rectangle instead. In the very center of your page, draw a horizontally-oriented rectangle. We recommend that for this initial stage you should leave plenty of room around your rectangular shape to allow for your goat’s head and limbs.


Step 2: Creating the Head of the Goat
You will use a tiny and thin oval form to draw the basic shape for the goat’s head. Place this oval somewhat slanted with the base towards the bottom right of your painting, some distance away from the upper left corner of the main body shape.


Step 3: Creating the Ear and Beard
It’s time to build the contour of your simple goat drawing’s characteristic Billy-goat ear and beard. Create a wiggly line from the base of the head circle for the goatee. Draw a little vertical circle on the peak of the head circle for the ear. Remember, just one of the ears is discernible from our vantage point, since the other is concealed by the horns.


Step 4: Creating the Goat’s Horns
This is a pretty easy process, and it is the final phase of building on your goat’s head. Merely sketch two horn forms below the construction shape for the ear. Because of our vantage point, the lower horn, which would be the one the farthest distance from us, is somewhat obscured by the other. To maintain a proper viewpoint in your goat drawings, make sure to represent this discrepancy.


Step 5: Connecting the Head and Body with a Neck
It is now necessary to connect the head and the torso. We’ll achieve this by connecting two necklines to the left-sided points of the goat’s rectangular body. Start at the upper neckline, tracing a curving path from the highest points of the skull circle to the upper left point of the torso. Start the lower neckline right beyond the goatee and curve down to meet the lower left point of the rectangle.


Step 6: Creating the Front Legs of the Goat Drawing
In this stage, you’ll sketch the front legs of your goat image. Start with the limb nearest to our point of view. Use two lines that start inside the main rectangle and bend gently near one another as they stretch down to the ground. Construct a narrower ankle that goes effortlessly into the hoof by separating this leg form from the heel and foot with a small curved line. You may do the same thing with the second limb. Once more, the viewpoint is important, since the farthest leg will seem smaller and narrower than the near one, and it will also be partly concealed by the one in front.


Step 7: Creating the Udder
Before we begin drawing the two rear limbs, we’ll define the form of the udder. Start sketching the udder around one-third of the way from the rear of the main section. Bend this arc down and back before forming a teat and then gently bending right back. Draw a tiny teat form just in front of this one. Bring the udder’s rear line all the way up to the primary rectangle once more. This portion of the udder will be hidden by the legs.


Step 8: Creating the Back Legs and Tail
This phase entails a variety of tasks. However, in the end, the final shape of your goat should be apparent. Start by sketching the back leg nearest to our viewpoint, beginning the line inside the main section, and moving down and backward. After the joints, the leg might continue to lengthen downward until it reaches the hoof form. Bend the leg upward behind the rear of the body shape as you move back up the other side of the leg, and then create the tail with some little curved lines. Simply sketch the lower part of the second leg sticking forwards from underneath the udder.


Step 9: Creating the Collar for the Goat
Creating the collar around the neck of the goat is the penultimate step before we construct the final shape of our easy goat drawing. Merely draw a collar band along the center of the neck.


Step 10: Creating the Outline of Our Goat Drawing
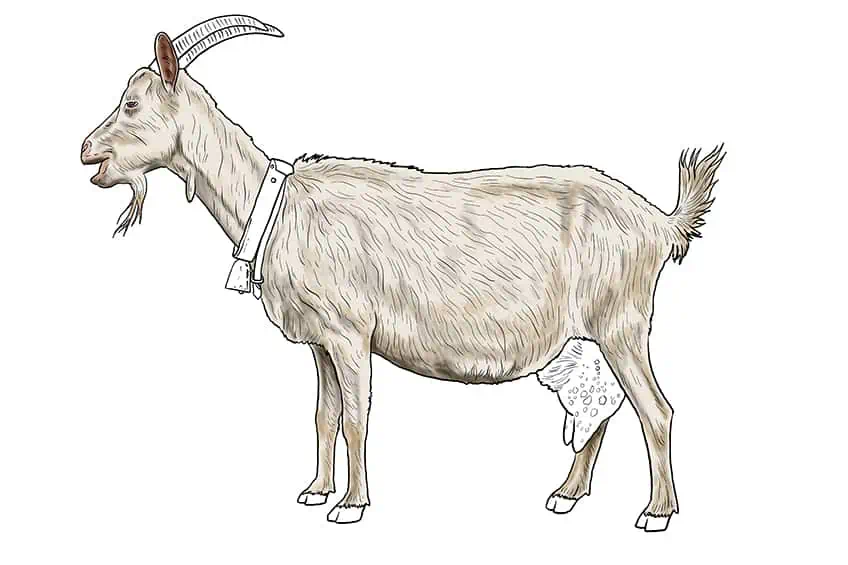
It’s now time to employ all of your building lines to assist you to form the finished outline of your goat artwork. Start at the top of the skull, using the circle to assist your line as you draw the nose, lips, and brow. Separate the lips and apply some more face elements such as an eyeball and a nose. To give the appearance of hair on the goatee, add several small fluffy strokes towards the end of the form. Contour the horns and ears first, then move on to the neckline, making a precise outline of the collar with a bell at the ending.


Continue outlining the remainder of the body, incorporating contours and protrusions to make it look more realistic and less rectangular like the building shape. To give the illusion of fur, use extremely tiny strokes to define the main body of the goat. All of these little lines should point to the rear of the goat’s body. You may do the same thing with the tail as you did for the goatee, fleshing it out a bit more. When you reach the udder and limbs, you may go back to clean lines and precisely follow the building forms. To distinguish the hooves from the rest of the limbs, draw a fuzzy line above each. When you’re satisfied with the completed shape, you may remove any apparent building lines.
Step 11: Including Texture Detailing
Now that we’ve established our outline, it’s time to apply some texture elements to the interior of our goat drawings. Start at the top of the skull, creating small tiny lines in both horns. Next, to create hair texture, begin drawing a mix of small and large lines across the head. The easiest approach to get the hair on your goat’s body to look as natural as feasible is to follow the contours of the body. Keep applying hairlines down the goat’s neck and torso, progressively lengthening the hairs as you progress. Draw a couple of circles of varying sizes for the udder. Leave the hooves uncovered.


Step 12: Creating the First Color Layer
By layering multiple hues, we consistently make sure to get the most realistic coloration for our artworks. We’ll start with a light hue of beige for our goat drawing. Spread the color uniformly on the goat’s body and head using a gentle brush. Make sure to keep the hooves, udder, collar, and horns blank in this stage because they will be in various shades.


Step 13: Adding Black for the Shading
With a dab of back paint, we’ll give some shading and depth to the torso of your goat. Employ this shade hue to draw out the characteristics of the head, neck, and torso by highlighting the areas where sunlight would not normally fall. Underneath the stomach, on the bottom of the throat, between the knees, and around the nose are examples of these regions. Keep in mind that it is quite simple to overuse black, so proceed with caution. You can easily apply more, but when it’s on your painting, you can’t take it off.


Step 14: Adding Color to the Details
In this stage, you’ll use a few various hues to highlight certain elements in your easy goat drawing. Start with a lighter brownish hue and apply regions of brown to your goat’s torso. Ensure to mix the brown into the colors surrounding it softly. Then, use a little deeper brown color to fill in your goat’s ears, as well as the insides of his nose, eyeballs, and lips. Finish by adding accents to the areas of color with a dash of white and ensuring that all of your hues are nicely merged throughout.

Step 15: Layering More Detail Coloring
In this phase, we will color your goat’s hooves, feet, udder, and coat. Start by coloring the horns with a uniform tone of darkish brown utilizing a pointed brush. The hooves and a portion of the collar can be colored with the same darkish brown color. Proceed by coloring in the goat’s eye with this hue. Next, color the clasp of the collar with the same pointed brush and a pale grey tone, then paint in the remainder of the collar with a darker gray tone. Complete the collar by coloring in the bell with some light golden or yellowish paint. To complete this stage, paint the goat’s udder with a peach tint.


Step 16: Adding the Highlights and Shadows
Start the final stage by coloring in the dots on the udder with dark brown color with a fine paintbrush. While you’re working on the udder, add a bit of highlighting around the patches using white paint, and then darken around the udder’s margins with black. Start by darkening along with the buckle and the bell with black and a light brush for the collar. Proceed to tint the hooves with black. Finally, employ a fine brush to apply some white highlights between both the outlines on the horns. To make the shadowing and highlights as seamless as possible, dab the brush lightly and then blend it out with a dry brush.


Step 17: Adding the Final Touches
This stage is recommended for individuals who want a finished product without the outline. Merely remove the outline or retrace it with the appropriate hue using a fine pointed brush to create this appearance. Outline the textured elements with their matching hues as well for a more seamless effect.


We trust you liked our easy goat drawing lesson and that you already feel comfortable sketching a variety of various goats. You can simply make a variety of unique wildlife illustrations now that you understand all of the techniques and methods.
Frequently Asked Questions
Can Anyone Create Easy Goat Drawings?
Yes, it is pretty simple to follow along with our animal drawing tutorials. In fact, with this basic goat drawing lesson, you can produce a stunning and easy goat drawing in no time. You’ve come to the correct site if you’ve ever wanted to learn how to draw a goat.
Can Similar Techniques Be Applied to Create Other Animal Drawings?
All of the ideas and tricks we cover in this lesson can assist you to create a variety of animals. The building lines are the most accurate technique to get accurate dimensions and perspectives. Don’t be disheartened if your image appears different. Everyone’s art is one-of-a-kind and distinctive.