
How to Draw a Sunflower – Create a Really Impressive Sunflower Picture
This post may contain affiliate links. We may earn a small commission from purchases made through them, at no additional cost to you.
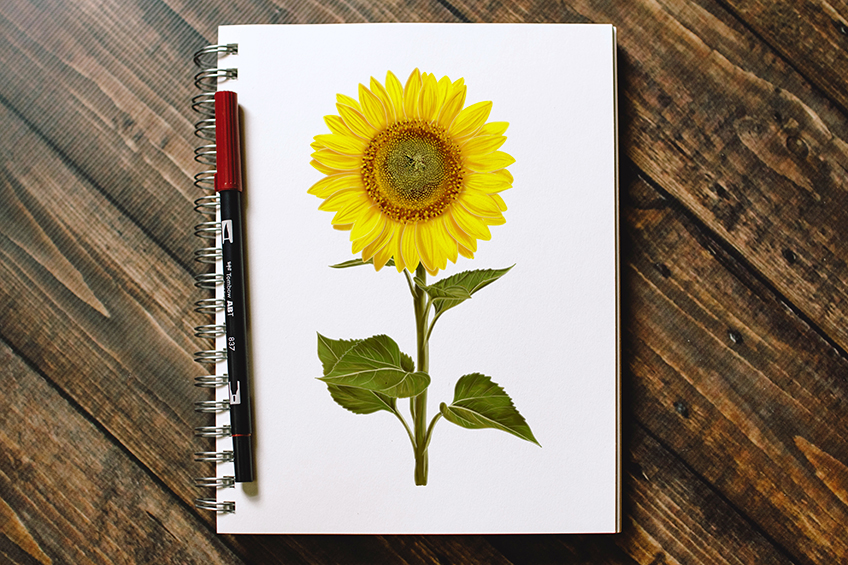
Stunning sunflowers face the sun as they move through the sky. Drawings of sunflowers are a popular choice for all artists to recreate, thanks to Vincent van Gogh’s famous painting called Sunflowers (1888). Bright sunflower petals overlay each other bursting with oranges and yellows. In this How to draw a sunflower tutorial, we will look at the different steps it will take to complete the sunflower shape and color shading of a realistic sunflower drawing.
Table of Contents
- 1 How to Draw a Sunflower: A Step-by-Step Tutorial
- 1.1 Step 1: Sketching Your Sunflower’s Center Circle
- 1.2 Step 2: Creating the Outlines of the Sunflower’s Petals
- 1.3 Step 3: Sketching Your Sunflower Drawing’s Stem
- 1.4 Step 4: Drawing the Leaf Branches of Your Sunflower Sketch
- 1.5 Step 5: Drawing the Leaves of Your Sunflower Sketch
- 1.6 Step 6: Filling the Center Seed Pod of Your Sunflower Outline Drawing
- 1.7 Step 7: Laying the Base Coat Color to the Sunflower Petal Drawing
- 1.8 Step 8: Adding Color to the Seed Pod of Your Sunflower Sketch
- 1.9 Step 9: Coloring the Leaves and Stem of the Sunflower Drawing
- 1.10 Step 10: Applying the Second Coat of Color to the Sunflower Drawing
- 1.11 Step 11: Creating Highlights on Your Sunflower Drawing
- 1.12 Step 12: Finishing the Coloring of the Sunflower Petal Drawing
- 1.13 Step 13: Adding Color Detail to the Sunflower Seed Pod
- 1.14 Step 14: Shading the Sunflower Seed Pods of the Sunflower Drawing
- 1.15 Step 15: Blending Your Colors
- 1.16 Step 16: Adding Color Detail to the Leaves and Stem of Your Sunflower Drawing
- 1.17 Step 17: Creating Texture in the Sunflower Drawing’s Leaves
- 1.18 Step 18: Adding Shadow to the Sunflower Sketch Leaves
- 1.19 Step 19: Adding the Highlights to Your Leaves of the Sunflower Drawing
- 1.20 Step 20: Highlighting the Stem of the Sunflower Drawing
- 1.21 Step 21: Finishing off Your Sunflower Drawing
- 2 Frequently Asked Questions
How to Draw a Sunflower: A Step-by-Step Tutorial
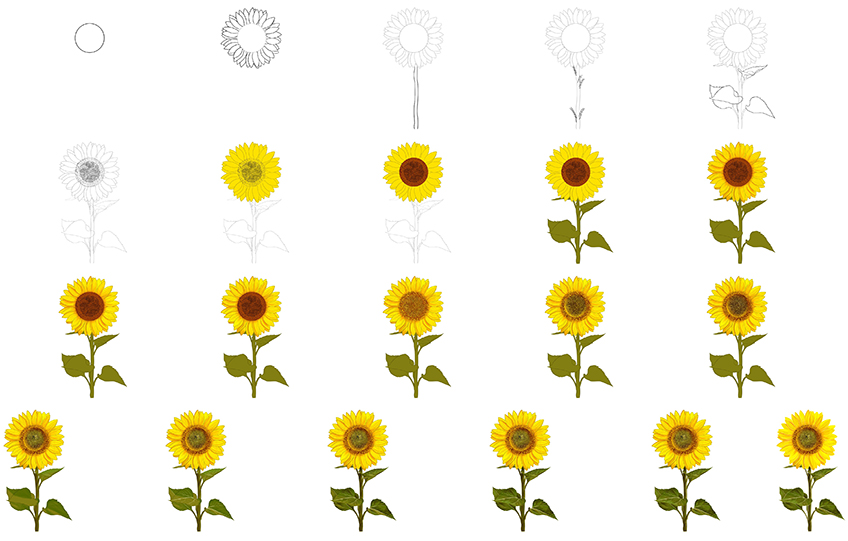
In today’s tutorial as we learn how to create drawings of sunflowers, we will go through the steps and stages of how to draw a realistic sunflower. To begin we will focus on building the foundation lines of the sunflower outline. Then from there, we will look at how to add color and create shading and shadows to add a high degree of realism to your picture. Please see the diagram image below for a good understanding of the drawing process before we begin.

The coloring process is the best part of this project. You as the artist have completely free choice of which medium to use, perhaps painting, color pencils, or color markers, and if you would rather use a digital medium like a drawing tablet that is fine too. Gather your supplies and let’s begin our sunflower drawing!
Step 1: Sketching Your Sunflower’s Center Circle
To begin step one, choose the position of your sunflower, which can be the center of your page. This inner circle of your sunflower outline will be what we call your foundation line. If you are using pencils as your drawing medium, then please start with a light pencil because you will erase this foundation line at a later step. If you are using a digital design tablet, please create a separate layer to remove at a later step.


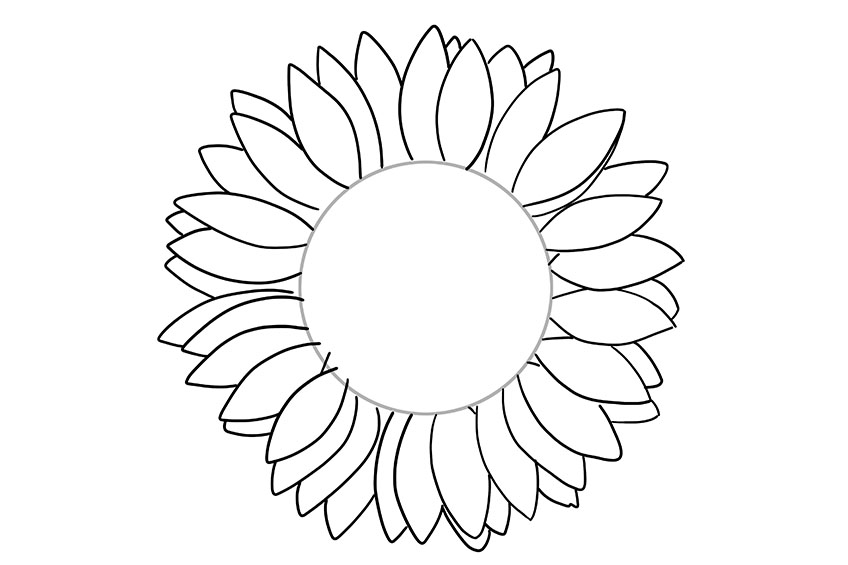
Step 2: Creating the Outlines of the Sunflower’s Petals
In this next step, we will be laying out the petals of our sunflower sketch. One of the reasons a sunflower is so bright and bountiful, is because of the multiple layers of flower petals. You can begin laying down the petal shapes around your center circle. When drawing your petal, lay the next petal close by.
Please see the diagram image below for guidance on how to outline the sunflower drawing.

Step 3: Sketching Your Sunflower Drawing’s Stem
In this next step, you will be constructing the sunflower’s stem. Remember that nothing in nature is perfectly straight, so draw your stems with a natural curvy line coming down your page from behind the flower petals. Sunflower stems are generally long and hardy, so don’t be dainty when you are drawing the stem.


Step 4: Drawing the Leaf Branches of Your Sunflower Sketch
The sunflower stem has beautiful large leaves. In this step, you will need to decide how many leaves your sunflower drawing will have; this is entirely up to you. Draw two small branches sticking out from the stem from step three.


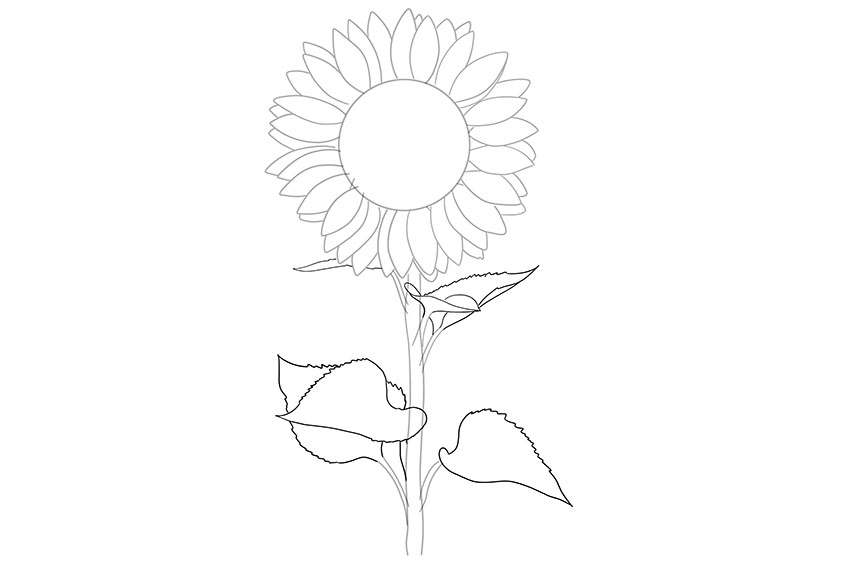
Step 5: Drawing the Leaves of Your Sunflower Sketch
We are close to concluding our final stage of outlining our sunflower drawing! The leaf outline is jagged and shaped like a heart with sharp ends. To draw your leaves more realistically, you can angle and overlap the leaves. Please see the diagram below for inspiration.

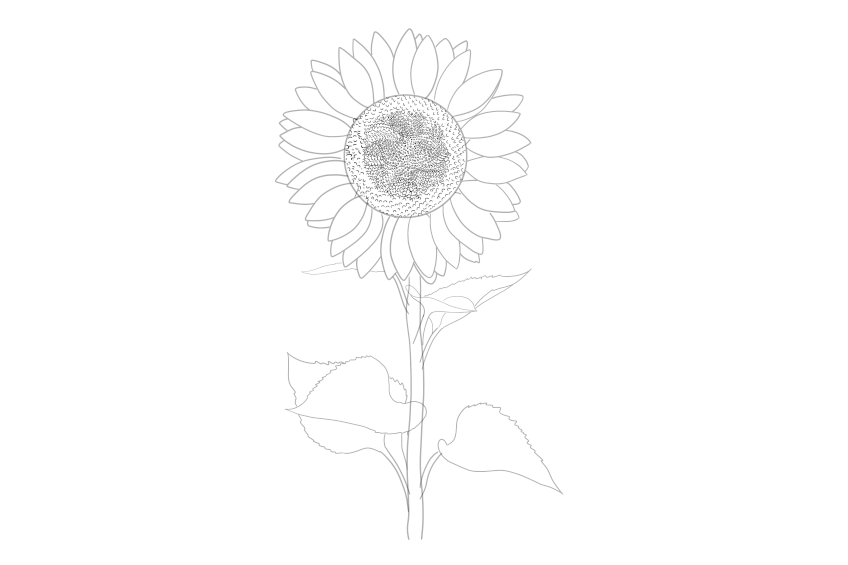
Step 6: Filling the Center Seed Pod of Your Sunflower Outline Drawing
This will be the final step of drawing your sunflower outline. We will be adding detail to the center seed pod of your sunflower sketch. You will create the seed pods by drawing tiny little circles. You can start from the middle and work outwards or do the opposite by starting from the outer circle and working inwards. The seed pod has larger seeds on the outer rim and smaller seeds in the center. We suggest that you make small circles on the outer part of your seed head and don’t overlap them.
Please see the diagram below for guidance.

Step 7: Laying the Base Coat Color to the Sunflower Petal Drawing
Depending on what drawing medium you are using choose a yellow color paint or colored pencil crayon or marker. Go over the entire center seed head and sunflower petal drawing with the yellow color. Be sure to not have any dark parts and colors within the lines.


Step 8: Adding Color to the Seed Pod of Your Sunflower Sketch
Take a light brown color of whatever medium you are using and add this layer to the seed part of your sunflower drawing. You can then add texture and trace over the tiny round seeds you drew in the previous step.


Step 9: Coloring the Leaves and Stem of the Sunflower Drawing
You will now add some green coloring to your sunflower drawing. If you are using a painting medium, you can take a smaller paintbrush and choose an olive-green color paint.


Step 10: Applying the Second Coat of Color to the Sunflower Drawing
When applying the second coat of color to your drawing of a sunflower, this is the opportunity to create detail and dimensions to make it a more realistic drawing of a sunflower. For those who are painting, Take a small blending paintbrush and some orange and yellow paint. Apply the paint and gently blend and contour the outer edges of your sunflower petals.
For those of you using colored pencils, shade and color yellow and orange from the outer line of the petal to the inside, keeping the center of your petals lighter and blending the pencil lines to look soft and shaded.


Step 11: Creating Highlights on Your Sunflower Drawing
In the previous step, you added a second coat of color and began contouring and shading the petals. Now it’s time to add highlights to the sunflower petals. For the painters, select a small, clean blending brush with a touch of bright light-yellow paint and simply add it to the edges of the sunflower petal drawing. Take your time and be sure not to go over the previous color and shading. For those using colored pencils, you can do the same with either white or a light-yellow color.


Step 12: Finishing the Coloring of the Sunflower Petal Drawing
Using a fine paintbrush, you will now finish coloring in the sunflower petals. Take bright yellow paint and add the fine hairs of each sunflower petal. Apply a small amount of yellow paint to each sunflower petal. Please see the diagram image below.


Step 13: Adding Color Detail to the Sunflower Seed Pod
The coloring phase of your sunflower petals is now complete. Now it is time to add more detail to the seed pod of your drawing of a sunflower. Using a fine-tipped paintbrush, apply some yellow paint to fill in each of the little circles that you drew in the sixth step.


Step 14: Shading the Sunflower Seed Pods of the Sunflower Drawing
You have added a yellow color to the seed pods of your drawing of a sunflower, so now, it is time to create dimensions and shading. Taking a small blending paintbrush and a touch of black paint, you can gently add shade between the seed florets, creating some depth and highlighting the tiny seed heads.
For those using colored pencils, fill in the dark areas between the tiny seed pods. See the diagram below for guidance.


Step 15: Blending Your Colors
Take some orange paint and a small blending paintbrush and gently shade between the dots and circles of your center seed pod. Play around with different shades of orange, yellows, and light brown, and create darker shades within the individual seeds. To finish it off and a touch of light yellow on the top of the seeds.


Step 16: Adding Color Detail to the Leaves and Stem of Your Sunflower Drawing
Our drawing of a sunflower is beginning to take shape and all that is left to do are the stems and leaves. Take a regular paintbrush and add light green paint. Apply bits of light green to the leaves, considering the shadows of the leaves when applying. Use the base coat color as well and add the light green shade to where the light would hit the leaf.
To finish it off nicely, you can add a darker shade of green to the stem and gently shade and create texture on the hardy sunflower stem and the tips of your shadow area of the leaf.


Step 17: Creating Texture in the Sunflower Drawing’s Leaves
The leaves should be looking detailed and shaded with light and shadows. It is now time to add the leaf veins. You will do this by taking a detailing paintbrush with white paint or a very sharp white-colored pencil. Draw the veins of the sunflower leaves and use the natural curve of the leaf, but remember, no leaf vein is straight! Try to keep it realistic by drawing lightning-style lines.


Step 18: Adding Shadow to the Sunflower Sketch Leaves
To finish off your drawing of a sunflower, it is good to add shadows to the sunflower sketch leaves. In the step above, you added the veins of the leaves. Now you can add shadows between the veins and edges of the leaves as well as on the small branches. You can finish it off by blending a touch of black paint or colored pencil by enriching the shadows.


Tip: When you are using black to shade, begin with gentle and light strokes, and then go darker when you are ready. You can always add more as you go, but you can’t do the opposite.
Step 19: Adding the Highlights to Your Leaves of the Sunflower Drawing
As we come to the final steps of our “how to draw a sunflower” tutorial, we will focus on how to add highlights to your leaves of the sunflower. You can take light green paint or a colored pencil and gently add the light color to the tips of the leaves and where the light would hit the tips. Take a blending paintbrush and simply shade the greens together. Use very light brush strokes here.


Step 20: Highlighting the Stem of the Sunflower Drawing
Add highlights to the stem by taking a finely detailed paintbrush and some white and bright green paint or colored pencil. Touch up the lines and body of the stem. Please see the diagram below for inspiration.


Step 21: Finishing off Your Sunflower Drawing
Our drawing tutorial comes to a close as we reach the final step of our sunflower drawing. If your sunflower sketch foundation line is visible, then you can erase it. For those using a digital design tablet, you can remove the foundation layer. By this stage, you are simply cleaning up the lines of your drawing of the sunflower and touching it up.


Good job! You have completed your very first step-by-step tutorial on how to draw a sunflower! Hopefully, you are pleased with your sunflower sketch and had a good time learning how to draw a sunflower. Please do come back again and join us for more fun and beautiful tutorials on drawing other flowers!
Frequently Asked Questions
How Do I Draw a Real-Looking Sunflower Outline?
Outlining a sunflower is easier than you think. In order to outline sunflower drawings, you need to first down the blueprint of a sunflower shape, it is a simple process of creating the foundation lines of a sunflower drawing to eventually look realistic.
How to Draw a Sunflower Realistically?
Making a realistic drawing or painting has a lot to do with drawing the correct dimensions and shading of the sunflower. You will start building the different color layers and adding shading to achieve that realistic edge. As with any realistic drawing, we begin by ensuring that we have the right dimensions for the construction steps. Then, we create our final outline and add realistic coloring in several layers. Finally, we remove the outline to create a seamless sunflower sketch.