How to Draw a Panda – Tutorial for Cute Panda Drawing
This post may contain affiliate links. We may earn a small commission from purchases made through them, at no additional cost to you.
There are many cute animals in this world that we may be inspired to draw, but out of all of them, the panda may just be the most adored. In this tutorial, we take you step-by-step through the process of drawing this beautiful animal. Whether you consider yourself to be an artist, or this is your first time picking up a pencil, this tutorial is easy to follow. Our fun tutorial is also compatible with various modes of creation, whether you are using a pen on paper or an artist’s tablet. In just a few easy steps, you will have an adorable panda of your own creation, so let us dive right in!
Table of Contents
- 1 An Introduction to the Panda
- 2 Step-By-Step Instructions on How to Draw a Panda
- 2.1 Step 1: Laying the Foundations for the Body
- 2.2 Step 2: Constructing the Face
- 2.3 Step 3: Constructing the Legs
- 2.4 Step 4: Constructing the Arms
- 2.5 Step 5: Constructing the Details in the Face
- 2.6 Step 6: Adding the Ears on Top
- 2.7 Step 7: Drawing the Eyes and the Nose
- 2.8 Step 8: Fleshing Out Our Panda’s Face
- 2.9 Step 9: Fluffing Out Your Panda
- 2.10 Step 10: Shading
- 2.11 Step 11: Enhancing the Light Shadows
- 3 FAQs
An Introduction to the Panda
These large black and white bears are native to the high mountains and thick bamboo forests of the center of China. Although their favorite meal is undoubtedly luscious bamboo shoots, pandas are, in fact, omnivores. Sometimes pandas will eat small fish or animals, but up to 99% of their diet is fulfilled by bamboo. It may not come as a surprise that pandas eat a lot of food. For up to 12 hours a day, pandas can be eating.


When they are born, baby pandas are only around 15 cms in length and they are light pink. Despite their tiny beginnings, many giant pandas grow to be between 1.2 and 1.5 meters tall. Towards the end of their 30-year lives, pandas can weigh a hefty 135 kgs. Now that you know a little more about these big furry friends, let us try to create our own.
Step-By-Step Instructions on How to Draw a Panda
Now you know some things about pandas, so it’s time to start working on our panda drawing! You will be guided step-by-step through all stages of the drawing process.
Step 1: Laying the Foundations for the Body
Often the most intimidating part of drawing an animal is trying to get the proportions and shape of the body right. We find that the best way to ensure that you have the right proportions is to begin by using different shapes. Now, it might seem strange to begin a panda illustration with a square, but as we get further into the tutorial, you will see how well it works.
This square will represent the lower half of your panda’s body, and the size of your square will determine the overall size of your panda. Remember to leave space all around the square, for all the other parts of your panda’s body.


Step 2: Constructing the Face
Sticking to our foundational shapes, we are going to outline the shape of the panda’s face with a large round circle. It is important that we get the right proportion between the head and the body in this step. You can see in our demonstration that the head is roughly the same size as the body. In this position, we are going to have the head of the panda leaning to one side, so you can see that we are drawing the circle on the right side of the square. If you want to, you can draw this in reverse, this is where your artistic freedom comes into play.


Step 3: Constructing the Legs
Now that we have the two largest two elements of our panda’s body planned out, it is time to lay down the smaller limbs. We begin with the bottom legs. Our little panda is leaning to the side, and this position translates into the legs too. The leg to our left is slightly closer towards us and as a result, it is slightly larger than the other. You will also see that both of the legs, as represented by elongated ovals, are the same shape and are in the same position relative to the square. Be careful of how far up your body your panda’s legs sit. You do not want the legs to sit above the midway line.


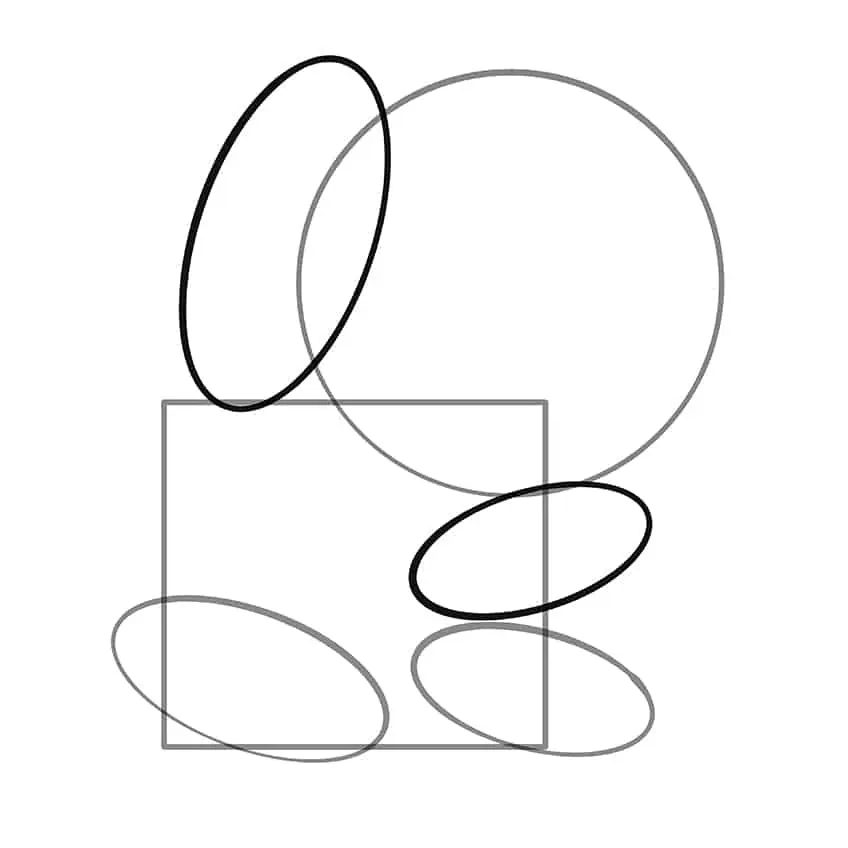
Step 4: Constructing the Arms
This next step is very similar to the previous one. It is in this step, however, that you will be able to see our little friend come to life. The ovals we use for the arms are exactly the same shape as those we used for the legs. The right arm is going to be exactly the same size as the right leg, and you can place it just above it, between the leg and the head. The right arm and leg should look as if they are reflecting themselves exactly. The left arm is going to be slightly bigger than the left leg, but the same shape.
In terms of the placement for the left arm, you want it to be at a slight angle with the very bottom sitting on the top of the square. You also want to position the left arm so that it slightly overlaps with the head. This position will create a perspective with the arm just in front of part of the face. At the end of this step, your drawing should look something like this.

Step 5: Constructing the Details in the Face
At this stage, we have the biggest parts of our panda laid down. Now it is time to start focussing on the smaller details in the face. Begin by constructing the midline of the face. Draw this line right through the circle at this angle. Once you have your face midline, you are going to draw a few more lines to structure the face. The first will be perpendicular to the midline and stretch from the top of the intersection between the arm and the face, and pass through the very top right corner of the body square. Slightly below this line, draw two more that are closer to each other than they are to the first. These lines are going to help us place the eyes and the nose of our panda. For reference, you can take a look at this drawing.


Step 6: Adding the Ears on Top
Out of all the steps so far, this is probably the easiest. All you need to do here is draw two little oval shapes on either side of the face midline. Depending on your personal preference, you can make these ears as big or small as you like. You do need to be careful about making the ears too big, or else your panda may begin to look like a different animal altogether.


Step 7: Drawing the Eyes and the Nose
Once you have finished this step, you will be able to see your little panda coming to life. Using the first angled construction lines, draw a circle at the center of each side of the face. These two circles will represent the eyes of our panda. On the very center of the second construction line, you can now draw a very tiny little oval. This small oval is the little nose.


Step 8: Fleshing Out Our Panda’s Face
We have finally got all of our construction lines down, so we can come to the exciting part. Now we can start to breathe life into our little panda, beginning with the face. Pandas are furry creatures, so we can begin to show this by drawing little hairs around the eyes. It is a good idea to draw the fur outwards in a circular pattern as this helps to add some depth and dimension.
You can now begin to draw a second furry circle inside each of the eyes. Again, you can draw a third smaller circle within the second. This third circle will not have any fur on it because it is the eyeball. Finally, you can draw the iris of the eye with the smallest circle. Try to position this smaller circle to one side of each eye, as you can see in our example.
Tip: Remember to always draw fur going outwards, and when drawing fur around anything circular like an eye this should be fur going outwards in a somewhat circular pattern.
Now you can draw the little half-moon-shaped nose on the second construction line in the face. From the center facial line, just above the third construction line, you can draw two half-moon lines that extend just beyond the edges of the nose. You can add a final half-moon line to join the ends of each of these lines, creating a smiling mouth. For added cuteness, you can pop two small half-moons on each end, to create little dimples.


Step 9: Fluffing Out Your Panda
Now that we have the face outlined, it is time to turn our squares, oblongs, and circles into the body of a panda. Using small strokes to create a fur-like line, begin to join together the different limbs. Begin to draw lightly, so that you can erase any mistakes easily. Begin with the head, outlining the circle and the ears with these fluffy strokes. Now, beginning from the intersection between the head and the left arm, outline the arm with these fluffy strokes to outline the arm, until you almost reach the bottom of the oblong.
From the bottom of the face midline, trace a curved line that crosses the top of the square and dips down just before the corner. You can then fill in the line between the bottom of the arm and this point, and continue down to the top of the oval. Use your intuition to create the body of your panda using the construction lines as a basis.
Tip: Do not follow the construction shapes, all you need to do is use them to give you a general idea of the shape to follow.
Add more detail to the nose by drawing a second half-moon within the nose itself. And adding a tongue within the mouth with a simple connecting line. On both paws add somewhat triangle shapes at the top (3 on each paw) which will act as the claws. Do the same for the legs and add a paw shape print on each leg try to make these face inverted directions so it looks like the legs are split. When you are happy with your shape, you can erase your construction lines.


Step 10: Shading
Your panda is almost complete! All that we are missing now is its distinctive black and white coloring and a touch of texture. In this step start by drawing small detail strokes of fur all around the face going outwards. It is important not to add too many strokes here, as this part of your panda is supposed to be white. You can do the same on the little round belly of the panda which is also white. This technique is to give the illusion that the panda has fur and is not blank.
On the face, you can start to darken the ears and the inner eye circles by drawing many short fluffy strokes. Rather than simply shading these areas black, the fluffy strokes help to create the texture of fur. You can color the bottom of the nose and the corners of the mouth dark black to make them pop, and also place a few small dots underneath the nose.
Finally, you can continue to shade the rest of the panda’s body with these fluffy strokes, leaving the paws and claws pure white. At the end of this step, your panda should look something like this!


Step 11: Enhancing the Light Shadows
If you are happy with your panda, you are more than welcome to leave it at this stage. Sometimes, we can be afraid to add too much in case we ruin what we already have. This final step, however, can help level up your panda drawing by adding some more depth and dimension. In this step we add light shading around the eyes, one side of the head, and around the body where it is white to give an even more detailed look. To do this on traditional drawing we simply use a light pencil to shade the area and use a cotton swab to brush the shading along the areas desired, on a graphic tablet simply use a light shading brush.

Now that we have come to the end of our tutorial, we hope that you have your very own cute panda drawing. You will have seen how easy it is to turn simple shapes into a fully fleshed-out panda. Once you have the basics down, you can alter the position of the panda and create more complex compositions. We hope you have enjoyed this tutorial, and wish you the best of luck with your future drawing endeavors!
FAQs
How Long Will it Take to Draw a Panda?
Drawing a panda by following this tutorial will not take long at all! If this is your first time following a drawing tutorial, it may take you a little longer to get to grips with the different steps. If you are accustomed to drawing, however, you can easily complete this tutorial in no more than half an hour!
Can I Use a Tablet for this Tutorial?
Absolutely! You can complete this tutorial by using a pencil and paper or a drawing tablet. A drawing tablet can also offer you many different brushes and techniques which can make your cute panda drawing more interesting.
Can a Beginner Follow this Tutorial?
This tutorial was designed for any artist from beginners to professionals. The first few steps lead you through the basics of proportion construction which is ideal for anyone who wants to begin drawing many different animals.