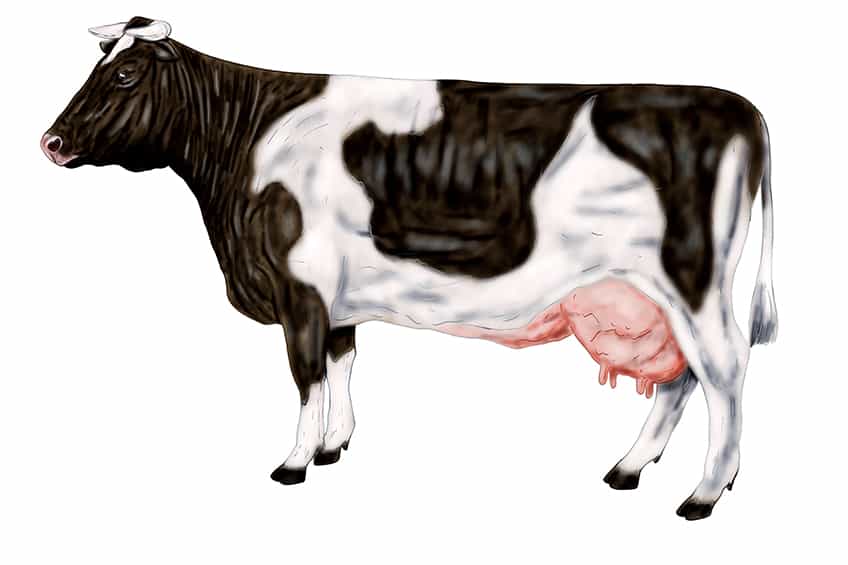
How to Draw a Cow – An Easy Cow Drawing Tutorial
This post may contain affiliate links. We may earn a small commission from purchases made through them, at no additional cost to you.
There is nothing quite like a country setting with a few cows scattered across a field, grazing away on sweet grass. If you enjoy drawing, beginner or not, this tutorial will teach you how to create a very impressive drawing of a cow. This is not just an easy cow drawing, it is also realistic, so you can rest assured that you will be able to complete your project in no time at all. Follow our fun step-by-step guide and you will soon enough be able to create an amazing cow sketch, on the go, or based in your studio!
Table of Contents
- 1 How to Draw a Cow: A Step-by-Step Tutorial
- 1.1 Step 1: The Main Body Construction Shape
- 1.2 Step 2: Foundations for the Head
- 1.3 Step 3: The Cow’s Nose
- 1.4 Step 4: The Outline for the Shape of the Horns
- 1.5 Step 5: Connecting the Head, Body, and Neck Together
- 1.6 Step 6: The Tail and the Rump
- 1.7 Step 7: Constructing the Cow’s Udders
- 1.8 Step 8: Shaping the Front Legs
- 1.9 Step 9: Drawing in the Shape of the Rear Legs
- 1.10 Step 10: Time to Outline!
- 1.11 Step 11: Adding Patterns and Textural Details
- 1.12 Step 12: Creating the Base Color Coat
- 1.13 Step 13: Darkening the Pattern
- 1.14 Step 14: Applying the Other Pattern Shade
- 1.15 Step 15: Using Color to Create Details
- 1.16 Step 16: Add Shadows and Highlights
- 1.17 Step 17: Adding the Finishing Touches
- 2 Frequently Asked Questions
How to Draw a Cow: A Step-by-Step Tutorial
Of the all the animals that can be found on a farm the cow is not the most difficult species of animal to draw. And, with our tutorial, cow drawing becomes even easier, since we have simplified each step into something manageable even for beginners. Creating your drawing of a cow begins with laying down construction lines and shapes. Once those have been laid down, we can move on to adding details with shading and coloring. Here is a summary of each step in this cow drawing tutorial.
It does not matter what kind of art medium you use for this tutorial. You can use any of your favorite drawing tools. Once you have gathered all the sketching equipment you might need – not forgetting your snacks and a refreshing beverage – you can begin to work on sketching your cow.
Step 1: The Main Body Construction Shape
As a rule of thumb, you should always begin any animal drawing by setting out the largest part of the body first. Therefore, the first thing we’re going to do in our cow drawing tutorial is to lay the foundations for the main part of the cow. We have found that it is very useful to use ovals as the main construction shape for most of our animal drawing tutorials, so let us stick to that.


Draw an oval in a horizontal position in the middle of the page or canvas you are working on. In the beginning, as you are drawing this first construction shape, be sure to leave plenty of space on both sides of it so that you can add additional parts of the cow later on.
Step 2: Foundations for the Head
The second step of your easy cow drawing is to lay down the foundation for the head. This is done by drawing another oval on the left-hand side of the main oval for the body. Leave a little space between the large and small ovals for the neck. Also, tilt this smaller oval downwards on the farthest side from the body, so that the cow’s nose will be pointing down towards the grass she’s planning on eating.


Step 3: The Cow’s Nose
In our construction phase, we can capture the cow’s face, which is shaped like a cone, by drawing a slightly misshapen “U” while still maintaining the oval shape at the end of the head.


Step 4: The Outline for the Shape of the Horns
Creating the horns of your cow drawing is yet another simple step because all you need to do is make sure that the horns are curved and tilted slightly on either side of the cow’s head. Angle the horns slightly downward on both sides. If the horn closest to us is directly above the horn that is furthest from us, we will obtain the correct perspective.


Step 5: Connecting the Head, Body, and Neck Together
Now for the part where you connect all the construction shapes together to form the outline of your cow’s neck. This online will connect the two oval shapes that were left spaced apart when you first drew them. Create a gentle curve from the top of the head oval to the top of the body oval, starting with the top of the head oval.


If you wish to draw the bottom neckline you should start where the nose meets the bottom of the oval of your head, and curve this line up to the point where the chin meets the top of the oval. Then you can curve the line down so that it joins the main body right beneath the front point.
Step 6: The Tail and the Rump
Your drawing of a cow will now be almost complete, leaving only its rear and tail to be added. For this step, two sections must be completed. We will begin by making the rump and the tail of the cow in the next step. Each of these sections can be completed using one continuous line.


Beginning at the top of the body oval, draw a line that is comparable to a square with rounded edges, crossing over the back of the main body oval. The lines must be curved at a 90-degree angle, and once that is done, you can create the effect of a curly tail. The line can be taken back up to a point and then brought down to meet the main body’s back point.
Step 7: Constructing the Cow’s Udders
We will now lay out the shape of the udder. Our cow’s udder is sketched by constructing an unfinished circle that will serve as the foundation for it, so add this in for now. We will add the teats later on. You do not want the udder to be too far behind the back legs since we still have to set out where the legs will be drawn.


Step 8: Shaping the Front Legs
For your easy cow drawing, you will notice that just behind the front legs, on the underside of the cow, there is a slight bump that sits square on its chest (take a look at the final drawing at the beginning or end of this tutorial). Where the neck connects with the oval, we must leave some space. Using straight lines that angle toward each other to form a cow’s upper leg, draw two lines on the first leg closest to us.


Make the leg joint by drawing a short curved line, followed by two parallel lines for the bottom. The last step requires some imagination because you must draw the shape of the hoof. Repeat the process for the other legs, remembering that perspective will make the two legs furthest away from us seem shorter.
Step 9: Drawing in the Shape of the Rear Legs
The same process can be followed for the front legs and the rear ones. Notice how the rear legs of the cow are very large and slightly curvier, and they also angle forwards. Begin with the very last leg of the board, the one closest to our point of view. As you cannot see the rest of the leg we suggest drawing the foot only, and you should angle the second leg slightly.


Step 10: Time to Outline!
It’s finally time reap the benefits of all that preparation sketching. Using your layout as a basis, you will now be able to create your cow drawing using the construction shapes to guide you.
If you follow all of the construction lines carefully, then you will be able to avoid making mistakes. You can add as many details to your drawing as you prefer. On the head, it is recommended that you draw a small ear to the right and left of each of the horns. Remember the ear behind the cow’s head should be smaller. An eye can then be added below the horns. A nostril can be drawn on the nose. And a small line can be used to create the separation of the lips.


Once the broad outline is complete, you can add a few small strokes to the tail to give the appearance of hair. It is possible to follow the construction lines of the leg relatively closely too, provided you add a line to give some definition to the hoof. You can create the main body by bringing up the leg lines of the front and rear legs facing us. Make the udder look realistic by drawing four teats and add the cow’s belly.
Step 11: Adding Patterns and Textural Details
Now to make our cow look real. Follow the construction lines very closely and add a few lumps and bumps – like the one on the chest – to fill out the area around the cow’s head and make it appear more natural. To add some definition to the hooves, you can add a line at the top of each leg’s construction line.


Step 12: Creating the Base Color Coat
We begin by applying our base coat of a darkish gray tone to the cow’s body, which is a single shade all over. Make sure that the cow’s entire body is covered in the same smooth and even base coat regardless of the color medium.


Step 13: Darkening the Pattern
Now that you have drawn the patterns on the cow’s skin, you are going to lightly color them in with some black paint or material of your choice. We recommend dabbing the darker tone on lightly so that it gives a dappled appearance. Take care not to make this layer too dark.


Step 14: Applying the Other Pattern Shade
You should have now colored the darker parts of the color pattern for the cow with dark colors, and the lighter sections with light colors. Now apply the same dab technique to the remaining areas of the page.


Step 15: Using Color to Create Details
This step requires a small brush or fine pen or pencil. You will be applying a light shade of pink. Add this to the underbelly and the udder, and use a small amount for the nose.


Step 16: Add Shadows and Highlights
The second last step in making your cow sketch involves creating shadows and highlights. By using a small brush and a little black paint or a fine black colored drawing medium, you can define the contours of the cow’s body, especially in areas where the light would not naturally fall. Then do the opposite using white – adding small highlights between shaded areas to provide contrast between these and the raised areas. If you are applying shadows and highlights with a dry brush or a smudging technique, you will achieve a much more natural result.

Step 17: Adding the Finishing Touches
Your cow drawing came out fantastic, and you can at this point leave the drawing as it is, if that is what you prefer. You may, on the other hand, ensure a seamless appearance for you cow by erasing each point of the outline into the surrounding background color. It is possible to trace over the outline of your cow with these shades to produce a beautiful and realistic-looking drawing.


Now that you have completed your drawing of a cow, you can sit back and admire what you have created. Our tutorial on how to draw a cow has covered everything you need to know if you are to achieve a stunning result. If you enjoy drawing keep an eye out for our animal drawing tutorials. You will see more soon!


Frequently Asked Questions
What Is the Right Perspective to use when Drawing a Cow?
If you want to represent the perspective and dimension of a cow in your drawing, then you need to begin with construction lines and shapes. Draw the general underlying shape of the cow on the page before adding any details. and keep in mind that the parts of the animal that are further way from the viewer must be drawn smaller than those that are closer.
Is This Tutorial on Drawing a Cow Suitable for Beginners?
Without a doubt. There is little difference in skill level for this tutorial. Whether this is your first time drawing an animal, or if you simply want to brush up on your animal drawing skills, our tutorial will guide you through the entire process.