How to Draw a Skull – A Step-by-Step Skull Drawing Tutorial
This post may contain affiliate links. We may earn a small commission from purchases made through them, at no additional cost to you.
One of the most useful exercises for improving one’s art skills is to learn how to draw a skull. Human skull drawing can aid you in many ways when it comes to drawing various parts of the human head, and the skull itself will also elicit a lot of symbolism and meaning within your artwork. This tutorial will show you how to draw a human skull in just a few steps! Keep reading for an easy guide on how to draw a photorealistic human skull, compatible for painting, traditional drawing, and for drawing on a graphics tablet.
Table of Contents
Why Draw a Skull?
You may be wondering why skulls are so popular in art. There are several reasons as to why this is so. Firstly, from a technical point of view, a human skull drawing offers great nuance in its complexity, complete with contrast, shading, and precision – this is no ordinary drawing subject. The skull is often depicted in a realistic way, and a skull drawing will allow the artist to get an in-depth understanding of their drawing subject. It has been said that the secret to mastering realism is to learn about the subject at hand’s internal mechanisms and structure, and you can do this with a skull drawing.
Improve Your Drawing Skills
The major advantage here is that you will be getting a better understanding of how the body looks and works beneath that which is visible – our skin. You will see how the bones of your nose look in relation to your eye sockets, or your teeth when they are not being covered by your lips.
Being able to visualize the proportions of these elements and how they interact will improve your skills as an artist.
Without the knowledge of our anatomical foundations, you will find it very difficult to create a human face or head realistically. By learning how to draw a skull, not only will you find the act of sketching any part of the human face much easier, but the overall look of your art will also improve.
Symbolism
The skull has a rather somber meaning in that to see a human skull is to be reminded of one’s own mortality. Skulls represent death, the ephemerality of human life, the mortality of ourselves and others… However, in many other instances, the skull is also seen as a celebration of life, as a symbol of change and transformation, as well as a symbol of wealth, power, and strength.

 Vanitas still life with a skull, sheet music, violin, globe, candle, hourglass and playing cards, all on a draped table (1662) by Cornelis Norbertus Gysbrechts; Cornelis Norbertus Gijsbrechts, Public domain, via Wikimedia Commons
Skulls were particularly popular art subjects during the Vanitas period of the early 17th century. This period saw many Dutch artists begin to contemplate their mortality and the futility of life on earth, the essence of which was captured in a range of dimly lit still-life paintings. These paintings would almost always include a skull, as well as other varying symbols of death, transience, and wealth.
A Note on Proportions
Before we can begin with our skull drawing tutorial, it will be useful for you to have a basic understanding of the proportions of a human face. Naturally, these proportions will vary from person to person, but knowing the basics will help you to maintain balance in your drawing.
If you were to look at a human face straight on, you will notice that it is wider at the top and becomes narrower towards the chin, similar to that of an opal, or even an upside-down egg. In a skull sketch, you would only be drawing the sockets and not the eyes themselves. It is important to note that the eye will always be smaller than the socket. The following proportions will use the eye as the standard for measurement:
- The face can be split into four sections by drawing both vertical and horizontal planes. You would put the nose over the middle of the vertical axis, and the eyes would be placed on either side of the nose on the horizontal axis.
- Typically, the space between the eyes is equivalent to the width of one eye.
- The distance between the middle area of the two eyes and the bottom of the nose is the width of one eye.
- The entire width of the face is approximately as wide as five eyes.

Step-By-Step Instructions on How to Draw a Skull
It is finally time to begin working on our human skull drawing! Below, we have included a list of materials you will need as well as the seven simple steps that stand between you and your perfect skull drawing.
Step 1: Drafting Your Skull Outline
In this step, we will find the center of our canvas and draw an oval shape vaguely resembling the width and shame of a human face and head. Use light construction lines for this and remember to leave some space at the top, bottom, and sides of the oval for future construction lines.


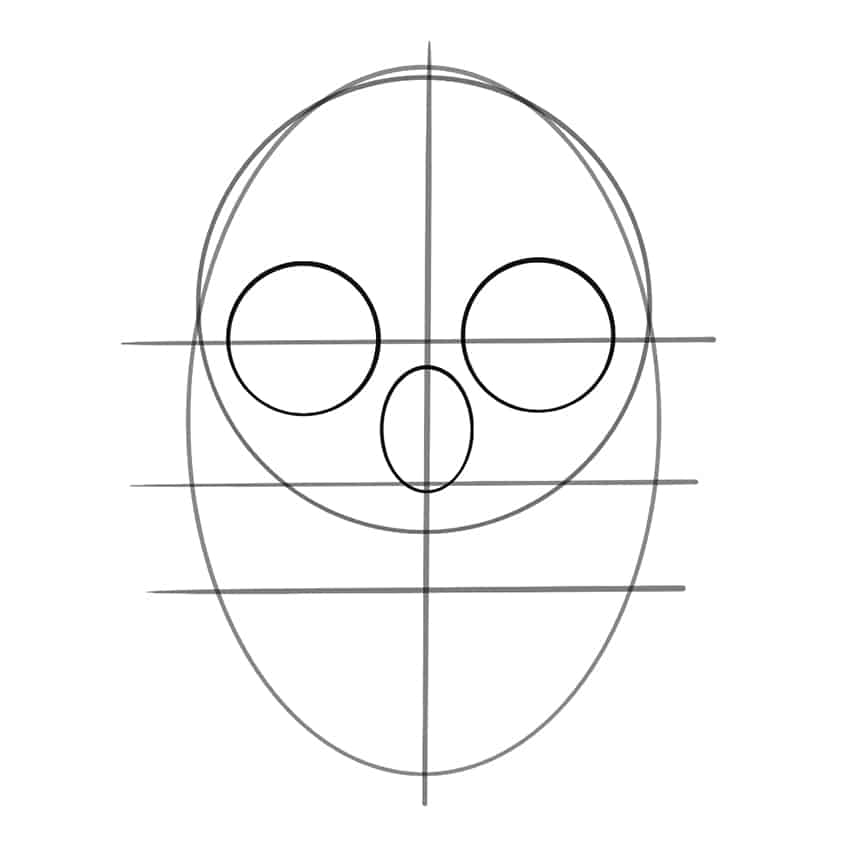
Step 2: Preparing Proportions and Symmetry
Here, we will begin dividing the face into separate parts in order to help us correctly place the eyes and nose in relation to each other.
- First, draw a circle within the oval shape of the face, leaving some pace underneath it for what will become the teeth and jawline.


- Now, find the center of the oval shape and draw a line down vertically. Doing this will help us achieve the correct proportions and symmetry when drawing the nose, mouth, and teeth.


- Following this, find the center mark of the circle you have drawn within the oval, and draw a horizontal line slightly below. This will help us to identify where to draw the eyes, and will also aid in providing symmetry, as per the human skull.


- Next, still using construction lines, draw a second horizontal line through the center of the oval – this should cross both the oval shape and the circle drawn within. This will help add symmetry to the cheek lines later on.


- Lastly, copy the previous step and draw another horizontal line crossing the oval shape, about two-thirds of the way down. Doing this will help with drawing the bottom of the cheek lines, and of course, it will help to keep symmetry as well.


Step 3: Add the Eyes and Nose
We will now be sketching the eyes and nose.
- Use the first (top) horizontal line and find the center points on both the left and right sides of the face. Draw two circles to act as the eye sockets.
- Then, use the vertical line and draw an oval shape just below the first horizontal line, slightly crossing over the second horizontal line.

Step 4: Time for the Teeth
For this step, use the bottom horizontal line and vertical line (to aid symmetry) and start drawing an even number of circles, starting from smaller sizes on both sides to the middle, where the largest teeth will be. Do this for both the bottom and top layers of teeth.


Step 5: Skull Outline, Jawline, and Structure
And now for the final basic foundations of your skull sketch – the shape and contour lines! While the basic shapes are great to begin with, your drawing will only begin to resemble a skull after refining it a little, which can be done by adding contour lines.
- Using a harder/darker pencil, begin by drawing the skull outline – the initial construction lines you drew for the oval shape can guide you.
- Then, using the middle horizontal line, draw two symmetrical cheek lines going down to just above the top teeth.
- Continuing with the oval construction line, draw a square-like shape with some bends and curves, giving a more human face-like shape to the skull. This will represent our jawline as well.


This is one of the most important stages of your skull drawing, as it is the foundations you set here that will determine the anatomical accuracy of your final drawing. Take a close look at your skull sketch and make observations: How big are the eyes and nose in relation to each other? How many teeth are there, and how do they fit into the curve of the mouth? Taking the time to observe the basics here will result in a realistic human skull drawing later on.
Step 6: Detailing Your Skull Sketch
In this step, you can begin to remove the construction lines and start adding details to all of the various elements of your skull drawing. You would use a darker pencil here.
- Try to adjust your eye holes to have slight bends at various angles to give the impression of bone. Do the same for the nose, turning the simple oval shape into an upside-down cavity (resembling a heart) with slopes and curves on either side.
- Now, using the construction circles you drew for the teeth, go over the teeth to give them a more accurate shape, beginning with smaller teeth (on either end) and going up in scale to the largest teeth in the middle-front.
- Next, you can add some cracks and other visual imperfections such as marks and scratches all along the skull sketch to give it a more realistic look. These can be placed and scattered as you see fit.
- Add some darker colors to your nose, eyes, and inner jaw areas to enhance them and make them more noticeable.


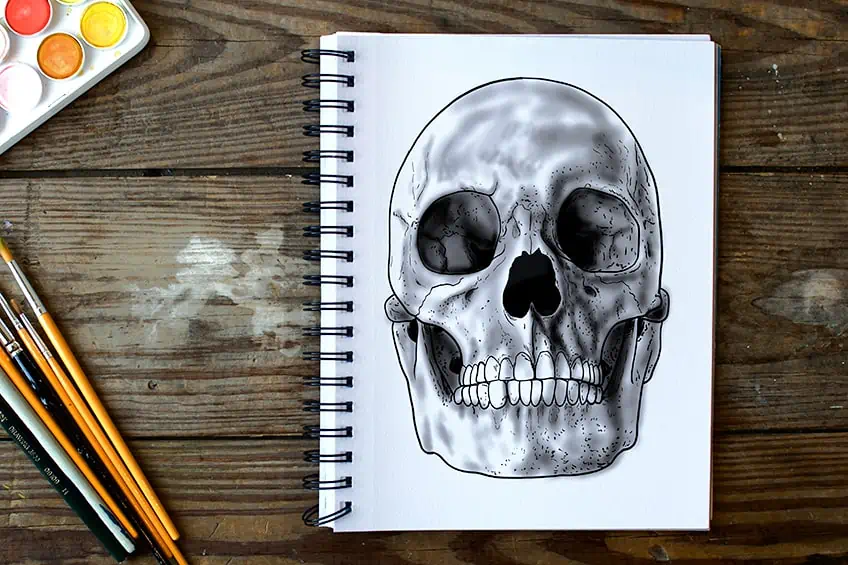
Step 7: Adding Dimension: Shading Your Human Skull Drawing
In this final step, we will be adding shading along the cracks and scratches we drew in the previous step. This will help us to achieve a bold, almost “raised” appearance, which will aid in creating realistic shading and highlights in relation to where the light source is. You will find that having several graphite pencils of various shades and thicknesses will be useful.
- When shading, you should always begin with lighter tones. Not only is this a good idea because lighter pencil markings are easier to erase, but using a darker color first is likely to result in accidental smearing and smudging as you work on your skull drawing. Thus, it is best to leave the darkest shades for last.
- To enhance your shading, you can use a soft brush tool (if using a graphics tablet) or a cotton swab (if drawing the traditional way). Using either of these tools will help you to create shadows and highlights with great effect.


- Any parts that are ‘within’ the skull will naturally be darker. For example, the eye sockets, nose, and the inner sockets on the sides of the jaw will need to be shaded from dark to darker to create depth.
- Think about your skull drawing in relation to light. Since the skull is rounded, the top of the forehead and teeth will be probably the lightest sections of your drawing. You can achieve a more curved look over these areas by using back-and-forth motions when shading.
- In this specific skull drawing, you will see that we added more shadow to the right side of the face, as if the light was being projected from the left. This gives your skull drawing a more realistic and nuanced look, especially when drawing a skull from a front-facing angle.
Erase any final construction lines and smudges, et voilà! Your human skull drawing is complete!
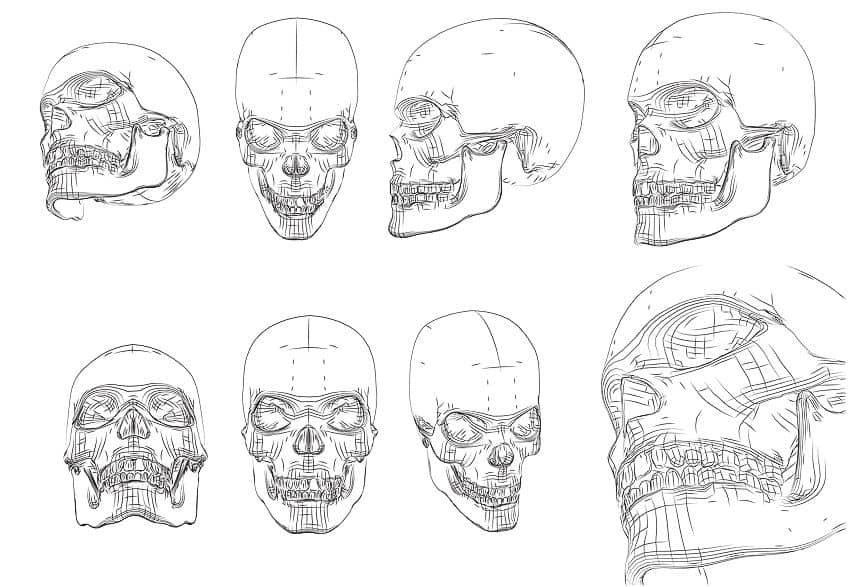
How to Draw a Skull from an Angled View
Now that you know how to draw a skull from a front-facing view, it can be helpful to know how to draw a skull from an angle as well. The overall process of sketching your skull from an angle as opposed to straight-on is more or less the same. The main difference that you will need to focus on is the technique of foreshortening.
Foreshortening is an artist’s technique that works to create depth, dimension, and to increase the realism of a piece. Thus, the eye of the skull that is closest to the viewer will appear to be larger than the other, and the nose of your skull sketch will partially cover some of the eye on the farther side of the face.
It is therefore very important that you get these proportions right, and to ensure this, we recommend sketching some guiding lines before placing any eyes or the nose. The lines will simply be drawn from an angle as opposed to straight on, and as long as you are able to use these lines as a guide, you should have no problem creating a human skull drawing from an angled or off-centered viewpoint.


Tips and Tricks on How to Draw a Skull
- As with any drawing of a face or head – whether an animal or human – your skull drawing should always begin with the draft of how large/small you want the end result to be, including a vague iteration of the desired shape.
- Learn to break down parts of the skull face into different sections to help you with proportions and symmetry. For example, you can use the above-described technique to separate the face into four sections by using vertical and horizontal lines. This will allow you to identify the best spots for you to draw the eyes, nose, and mouth in order to achieve the most realistic skull drawing.
If you are not familiar with an object you are drawing, try to use reference images or objects to aid your perspective and detailing.
- You can practice more realistic shading by placing an object in front of you that resembles the subject you want to draw. Choose a source of light and then begin to add shading and highlights to specific areas to give the illusion of light creating shadows, which will contribute greatly the photorealism of your skull drawing.
- A detail that stands out the most on a skull drawing will almost always be the eyes and the teeth. Try to draw small cracks from the eyes going in a curve around the face that leads onto the jaw, as this will create an illusion for the human eye to go in a circular motion, causing them to look at the entire drawing of the skull instead of just the eyes or teeth.
- Even though symmetry is appealing in art, it can also be beneficial to draw uneven features on your skull, such as sockets with cracks and missing pieces. This will age your skull drawing, making it look much more ancient.

Frequently Asked Questions
Is Skull Drawing Difficult?
Drawing is a skill, and skills can be improved upon through research and practice. That said, skulls are not too difficult to draw, as they have a simple shape, although they do require a great deal of precision, which means that they are a great way to practice achieving anatomical correctness in your drawings. Thus, skull drawing is a challenge for beginners looking to improve on their artistic abilities.
What Do Skull Drawings Symbolize in Art?
Skulls have been prevalent symbols throughout art history, making their greatest contribution to the Vanitas art movement. Skulls tend to represent the inevitability of death and the temporality of our short lives. However, skulls can also be used in conjunction with other objects to adjust their symbolism.