How to Draw a Cat – Sketch your Favorite Feline
This post may contain affiliate links. We may earn a small commission from purchases made through them, at no additional cost to you.
Cats are very smart animals and are loved by many people as pets around the world. They have inquisitive eyes, attentive ears, and beautiful posture, which makes a cat a wonderful drawing subject. Irrespective of whether you consider yourself a dog person or a cat person, there is much to be learned from creating a cat sketch, such as perspective, proportions, and learning how to add details like fur. In this easy-to-follow tutorial, you will learn how to draw a cat with all the correct proportions and details. You can easily make your drawing look more like your own cat by adjusting the colors. We have made cat drawing easy and simple, so get your supplies together and let us get started with your drawing of a cat!
Table of Contents
- 1 Tutorial on How to Draw a Realistic Cat
- 1.1 Step 1: Creating the Body for the Cat Sketch
- 1.2 Step 2: Creating the Cat’s Head
- 1.3 Step 3: Creating the First Front Leg of the Cat
- 1.4 Step 4: Creating the Second Front Leg for the Cat
- 1.5 Step 5: Creating the First Rear Leg for the Cat
- 1.6 Step 6: Creating the Second Rear Leg for the Cat
- 1.7 Step 7: Creating the Tail for the Drawing of a Cat
- 1.8 Step 8: Creating the Ears for the Cat Sketch
- 1.9 Step 9: Adding a Fine Outline to Your Cat Drawing
- 1.10 Step 10: How to Add Details and Texture
- 1.11 Step 11: Add the First Coat of Color to your Cat Sketch
- 1.12 Step 12: How to Add the Second Coat of Color
- 1.13 Step 13: Adding the Third Coat and Blending Shades
- 1.14 Step 14: Adding Tabby Cat Stripes
- 1.15 Step 15: Adding Highlights
- 1.16 Step 16: Adding Shading
- 2 Frequently Asked Questions
Tutorial on How to Draw a Realistic Cat
It is hard to find anyone who doesn’t love these beautiful little fur-balls. They are great company yet also know how to keep themselves occupied and don’t demand constant attention. Due to their long tails, cats have amazing balance and are very sleek and agile creatures. They can use their whiskers to determine if they can manage to squeeze through very tight spaces.


Cats and giraffes are the only known animals that walk with a front and back leg simultaneously on each side, first taking a step with both left paws and then a step with both right paws. Let us now take the first step of this tutorial about how to draw a cat.
Step 1: Creating the Body for the Cat Sketch
As with any of our drawing tutorials of an animal, we always first start our sketch with construction lines. No matter whether you are a novice or an accomplished artist, the use of construction lines is always a useful tool. By starting with construction sites, it helps make the process of our cat drawing easy by ensuring that all the shapes are in proportion before we start adding the details. For our drawing of a cat, we will start with creating a long stretched-out oval shape. To better follow the natural shape of a cat’s body, angle the oval down slightly on the right-hand side. During the first step, it is essential that you position your oval right in the middle of your picture. This will help ensure that there is enough space around the body to fill in the other limbs like the legs, tail, and head.


Step 2: Creating the Cat’s Head
For the next step of our cat sketch, we are going to create the head of our cat by using another oval. This oval should be considerably smaller than the other oval and angled more steeply down to the right. The two ovals should not overlap and the head oval should be placed in front of the body.


Step 3: Creating the First Front Leg of the Cat
The front leg is the next step that we need to create for our drawing of a cat. We are going to start with the front left leg of the cat. Due to this leg being hidden from our view by the body, we can start the lines for this leg straight from the bottom of the body. Starting just below the front part of the body, draw two lines extending towards the bottom right corner of your canvas. They should slant slightly inwards and the gap between them should decrease as they go down. Now at the bottom of the two lines, draw an oval that is slightly angled upward on the right. This will be used to create a paw for the cat later.


Step 4: Creating the Second Front Leg for the Cat
In this next step, we will repeat the process we used in the last step, but for this leg, rather than draw them angled forward, we are going to draw them straight down. At the bottom of the lines draw another little semi-circular oval shape for the paw.


Step 5: Creating the First Rear Leg for the Cat
The next step will focus on creating the rear leg for the right side of the cat. First, create a rectangular shape that is wider on one side, with the wider side connected on the bottom left of the body oval. It will make the leg part of the cat drawing easy if we split it into two parts by the knee joint. This first shape is the thigh of the cat’s leg.


Now draw another two lines from the joint downwards and add another semi-circle on the end for the paw of that leg. Now we are starting to see the legs start to take shape in our drawing of a cat.


Step 6: Creating the Second Rear Leg for the Cat
For this leg, we are going to apply the same essential steps as the other one, but this rectangle for the thigh is going to be pointing downward rather than towards the back. Make sure that the back top part of the thigh goes behind the right leg to keep the perspective correct from our view.


For the final part of this step, draw another two lines down and add a semi-circle for the paw, however, make sure to angle these lines slightly forward and make sure the paw is also positioned facing forward. At this point of learning how to draw a realistic cat, we can already see the beginnings of our cat’s form coming out of the construction shapes, such as is illustrated in our example below.


Step 7: Creating the Tail for the Drawing of a Cat
In this step, we will add a construction shape to represent the cat’s tail. From the back part of the cat\s body, draw a curved line extending upward. To get that distinctive cat curl look to the tail, add a curve like an umbrella handle at the end of the construction line.


Step 8: Creating the Ears for the Cat Sketch
This is the final step of construction before we start with the outlining process of our drawing of a cat. The best place to add the ears is right on top of the head oval, just to the right of the middle point. Start by drawing a triangle on the top of the head oval, and then behind that one draw another slightly rounder one. To get the right perspective make sure that the front one overlaps the back one.


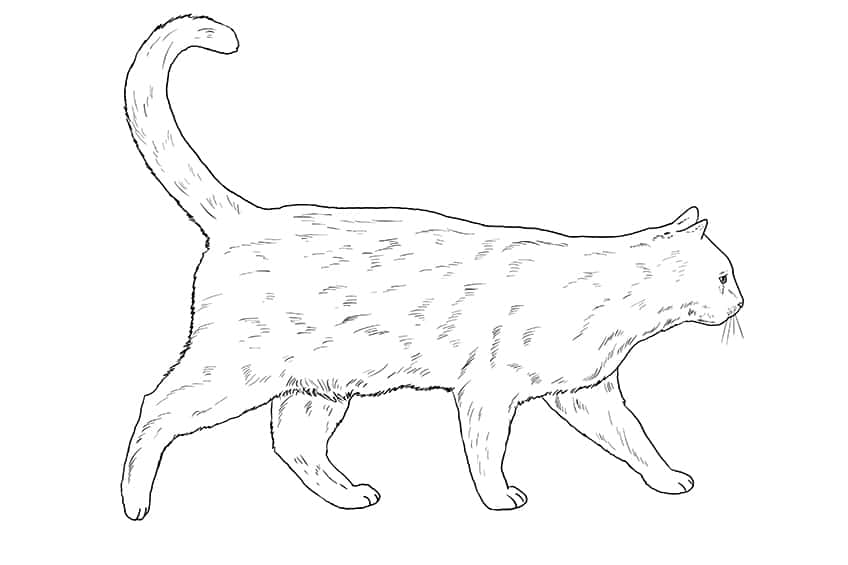
Step 9: Adding a Fine Outline to Your Cat Drawing
Now that we have completed the construction phase, we can now put them to use as a guide for our outlining. The ideal place to start with the outline is on the cat’s head. Using the shape of the oval as your guide, first outline the ears and then slightly flatten the top, then curve slightly inward toward the bottom before creating a little bump at the end for the nose. Once you have gone around the chin, draw a line that connects with the oval just below the front point of the oval.


For the remainder of the outline, you can follow the rest of the construction lines quite closely. When it comes to the tail part, draw a line around the tail to make it thicker. You do not have to be exact, so, please feel free to add some bumps and curvy bits to add realism to your drawing of a cat. To help create the impression of fur, use short strokes on the outline at places such as the belly. Also, add a few curved lines over the paws to make your cat sketch more realistic. Now that your outline is complete, you can use your eraser to remove any existing construction lines that you might still be able to see.
Step 10: How to Add Details and Texture
Now that we have completed the outline step, we can begin to add details such as the face, and textures like the fur. This will be the first of two parts to adding details to your cat sketch, the next part will be adding paint.

The first detail we are going to add is the eye, and to do so we are going to insert a small “v” shape on its side, with a semi-circle in the middle of it. Once you have created the circle for the eye, add another one inside for the iris part. Now create a few small lines for the eyebrows as well as underneath the eyes to create the same desired texture. Add a few lines by the nose bump to create some nostrils and then draw in some whiskers for your cat. Use little strokes throughout the body to create the texture and look of fur.
Step 11: Add the First Coat of Color to your Cat Sketch
We have chosen to make our cat a tabby cat, but you are welcome to adapt the palette to suit your own preferred look if you wish to create a picture that is similar to your cat home. However, if you want to follow along with our chosen colors, then we will begin by adding a light brown shade throughout the body as a base color. We will add darker shades next, so make this one light.


Step 12: How to Add the Second Coat of Color
Now we are going to choose a light grey for our next layer of color. Add this color all over the body as well, but leave a few areas brown around the belly, legs, and nose of your cat. After you have completed that step, it should look something like this.


Step 13: Adding the Third Coat and Blending Shades
Take a softer brush now and add a third coat lightly using a darker shade of brown this time. As with the grey, we want to concentrate on the top parts of the cat and leave the bottom pieces lighter in shade. If you want to know how to draw a realistic cat, add this layer in a patchy manner to help simulate the look of real fur.


Step 14: Adding Tabby Cat Stripes
What makes a tabby cat so recognizable is its stripes which are similar to a tiger. To help make this look true-to-life, we are going to use dark grey or black to make the stripes. These stripes should be rather narrow and should not cross one another. Make some lines curve a bit and some go in different directions, as long as they don’t connect. The stripes on the legs should not be vertical but should run horizontally to make it look like a real tabby cat.


Step 15: Adding Highlights
If you want to know how to draw a realistic cat, then you need to know how to use shadows and highlights. This will make your cat drawing easy on the eye. They will also give your drawing more perspective and depth. Create a light cream shade and add a few lines next to the lines to help bring out the contour of the cat’s body. You can also use this shade to add some highlights to the belly and face, as well as the top part of the cat’s back.


If you are not too sure where to add highlights to your drawing, then imagine that your cat is in a room, and try and picture where the light source would be angled from. This will help you know where the light would fall and which areas should therefore be highlighted.
Step 16: Adding Shading
In this last step, we will use a black or dark grey to add some shadows by basically doing the opposite of what you did with the highlights. Imagine the light source once again, and then wherever the light wouldn’t fall, add some shading texture. Focus on areas like behind the legs, on the neck at the back, bits of the tail, and maybe on the legs. Do not overdo this part, as adding too much shade can make your drawing look too dark and might ruin it.


And with that last and final step, you have completed your tutorial on how to draw a cat. We hope that we have made cat drawing easy and fun to do. You have learned everything from creating basic construction shapes to how to draw a realistic cat by adding the shades and textures. By creating your cat sketch you have learned some new techniques which can be applied to your other drawings too! Good practice in shading and proportion will help make you a better artist overall.
Frequently Asked Questions
How Long Will It Take Me to Create a Drawing of a Cat?
It might take longer if it is your first time doing a tutorial of an animal drawing. But, we have made it simple to follow, and before you know it, you will be on your way to creating animal drawings of all kinds in no time at all!
Can I Use Paint Instead of Pencils?
Yes, you most certainly can use paint if you prefer! The instructions in this tutorial can be followed no matter whether you are using pencils, crayons, paint, a tablet, or any other medium that you prefer to create with.