How to Draw a Heart – A Step-by-Step Guide on Drawing Hearts
This post may contain affiliate links. We may earn a small commission from purchases made through them, at no additional cost to you.
At some point, most of us have wanted to draw a heart, for one reason or another! More than likely, you have come across this tutorial because you are adding a heart drawing to a card for the person you love. But, how to draw a heart is not necessarily that simple – at least not if you want to learn how to draw a perfect heart, that is! This tutorial will show you exactly how to do a heart sketch in just a few basic steps. We have also included a how-to for realistic coloring and shading, and even a bow to tie up your heart drawing beautifully. Get your art goodies ready and let us get started!
Table of Contents
- 1 How to Draw a Perfect Heart
- 1.1 Step 1: Draw an Upside-Down Triangle
- 1.2 Step 2: Draw the Division Line
- 1.3 Step 3: Drawing the Left Circle
- 1.4 Step 4: Drawing the Right Circle
- 1.5 Step 5: Drawing the Bottom of the Heart Sketch
- 1.6 Step 6: Drawing the Outline of Your Heart Sketch
- 1.7 Step 7: Drawing the Ribbon’s Stripe
- 1.8 Step 8: Adding a Curve to the Ribbon
- 1.9 Step 9: Creating the Bow
- 1.10 Step 10: Completing the Bow’s Construction
- 1.11 Step 11: Outlining Your Heart Drawing’s Bow
- 1.12 Step 12: Adding Your Bow Flaps
- 1.13 Step 13: Erasing the Overlap
- 1.14 Step 14: Your First Coat of Color
- 1.15 Step 15: Adding the Shading to Your Heart Drawing
- 1.16 Step 16: Adding the Highlights to Your Heart Sketch
- 1.17 Step 17: Coloring the Bow
- 1.18 Step 18: Completing Your Heart Drawing
- 2 Frequently Asked Questions
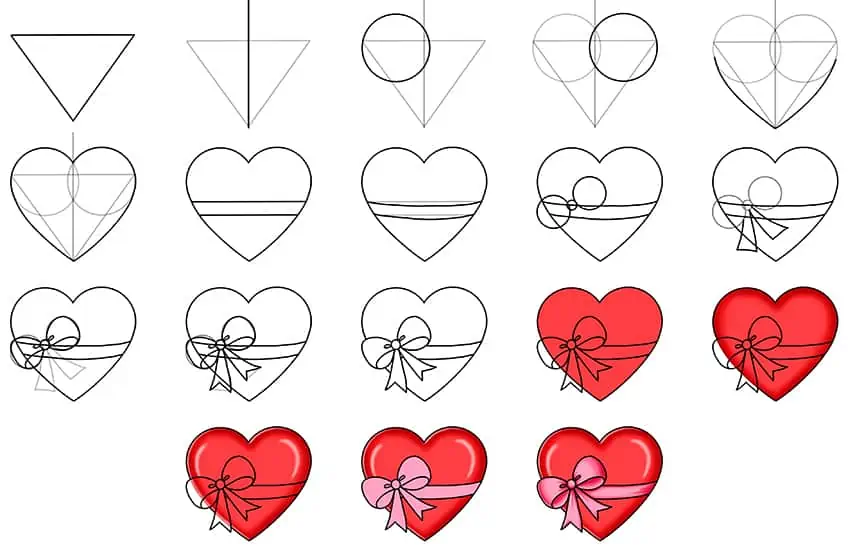
How to Draw a Perfect Heart
Yes, drawing hearts is not the most difficult thing to do, but learning how to draw a perfect heart can be a little trickier. The perfect heart sketch is symmetrical, and this is what we are going to teach you today. To begin, you will have to draw some construction lines which will help form your drawing of a heart later on. Have a look at the image to follow, as they detail the steps you can expect from this how-to-draw-a-heart tutorial.

As with all of our easy-to-follow tutorials, the medium you choose for drawing is entirely yours to decide on. You could even complete this heart drawing on a graphic tablet if you so wish! For the purpose of our heart sketch today, we will be using paper and paint. Get your supplies ready, and let us do our first step!
Step 1: Draw an Upside-Down Triangle
Step one is to outline the basic shape for your drawing of a heart. It is the foundation of what is to eventually become a beautiful and symmetrical heart! Draw an upside-down triangle with three equal sides.
Make sure that your triangle is placed in the very center of your page or canvas.


Step 2: Draw the Division Line
The point at the bottom of the triangle is where your division line will be located. You can now draw a vertical line that starts at this point. Draw your line up and out of the top of your triangle. You will now notice that your triangle has been split into two. This line is what will later help you to create perfect curves for your heart drawing.


Step 3: Drawing the Left Circle
For a perfectly symmetrical heart with symmetrical curves, you will now draw two circle shapes. Your first circle will be on the left-hand side of the division line. This circle should touch the left point of your upside-down triangle, and then ever-so-slightly overlap the centerline.
Have a look at the following image for a better understanding.


Step 4: Drawing the Right Circle
Drawing hearts has never been this simple! All you need for step number four is to repeat what you did in step three – this time, on the other side of your center or division line. As with your first circle, this next one will also need to overlap the centerline slightly.


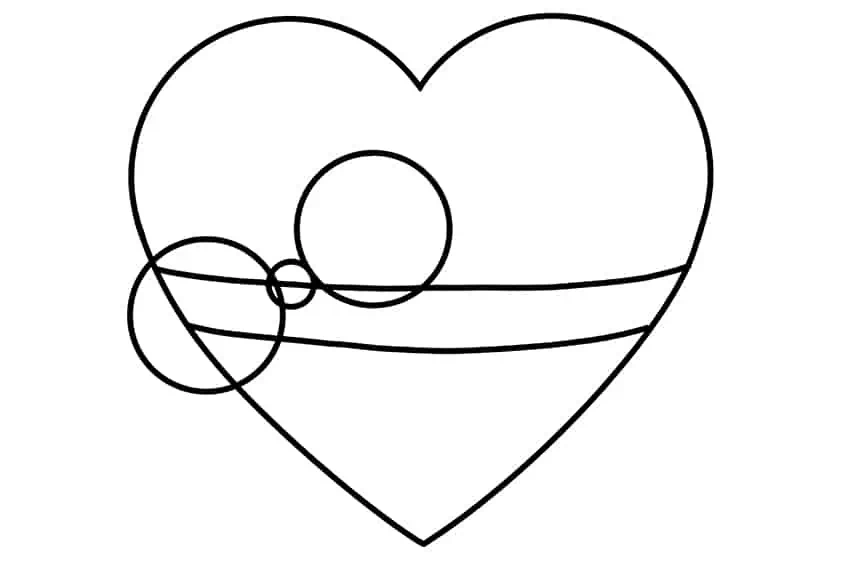
Step 5: Drawing the Bottom of the Heart Sketch
You will now draw the lower curves that help shape your heart sketch. On each side of your heart drawing, you can draw a curve that starts at the point of the triangle and then joins the circle on either side.
You should now be able to see your drawing of a heart taking shape!


Step 6: Drawing the Outline of Your Heart Sketch
After this quick and easy step, your heart drawing will have the perfect outline. Using the circles and centerline of your heart, you can complete the curvature of your heart sketch on either side with a pen. Now is the time to bring out the eraser and get rid of the visible pencil construction lines that remain.


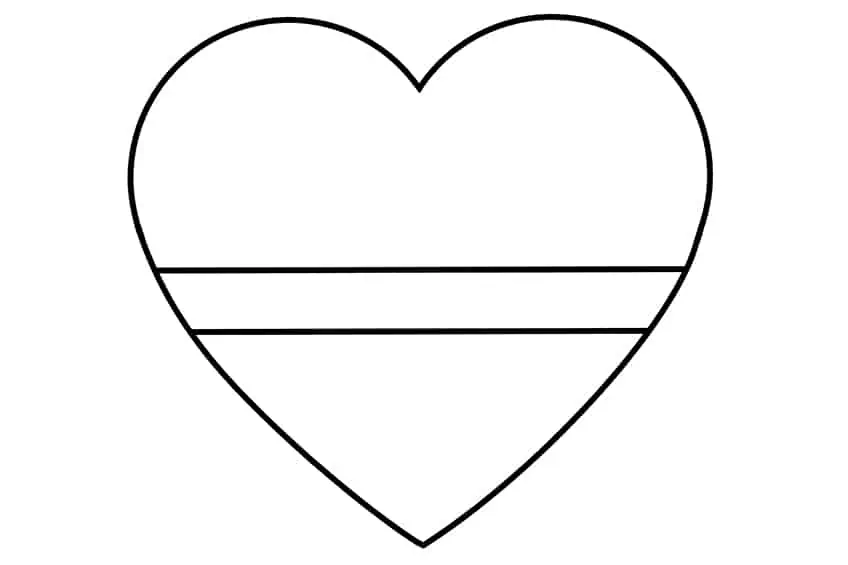
Step 7: Drawing the Ribbon’s Stripe
Now that your heart shape is completed and outlined, you can start drawing the ribbon that wraps around it. In order to do this, you can draw two construction lines that will go over the heart horizontally. Remember to draw your lines very lightly, as these will change further on in the tutorial.

Step 8: Adding a Curve to the Ribbon
Now you will add a curve to your ribbon! Remember, our heart drawing is three-dimensional, thus, we need to highlight this by adding appropriate curvature. Simply add a little curve to the ribbon to make it look like it is hugging or wrapping around the heart.
You can now completely rub out the construction lines from step seven.


Step 9: Creating the Bow
Now for more construction lines! If you have been drawing your heart graphically, you will simply add a layer. If you are using pencils, remember to draw lightly as these will be erased as usual at a later stage. Draw a little circle on the top ribbon line. Make sure that the middle of your circle is on this line. Now, on both sides of this smaller circle, draw a bigger circle.
You will now move on to creating the finishing touches for your bow.

Step 10: Completing the Bow’s Construction
To complete your bow, simply draw flaps that extend downward from the small circles center. Have a look at the image below to get a better idea of how to do this.


Step 11: Outlining Your Heart Drawing’s Bow
You can now outline your bow using the construction shapes and lines you have created. Make the curve more realistic, and draw the inner parts of your larger circles slightly narrower. You can also add a curve at the bottom of each of these. This will help your bow to appear more three-dimensional.
You can also add two additional cures which extend from the center of the circle. To end it off, add a little cut mark on each flap.


Step 12: Adding Your Bow Flaps
To complete your bow, you will need to outline these two flaps and add sharper ends to each. This is so that they resemble cut bow flaps. Once this is completed, you can trace over the entire construction of the bow to create distinct lines.


Step 13: Erasing the Overlap
At this step, all you need to do is rub out the construction lines that overlap on your heart and ribbon. And now, your heart sketch is finished! What we will do now is add some color, highlights, and shading to bring it to life!

Step 14: Your First Coat of Color
You want your heart to look realistic and three-dimensional, and the way you add your color will emphasize this. As with all drawings, color should be built up. Start off with a regular brush and some light-colored red paint to fill the heart entirely.
You can also color the parts of the bow within the heart’s outline with this red color.


Step 15: Adding the Shading to Your Heart Drawing
Now you will add some shading to the outer parts of your heart drawing, as this will help make it really pop! Using some black paint and a softer blending brush, add some color to your heart’s edges. You can now take a clean, dry blending brush and smear the shading that you created.


Step 16: Adding the Highlights to Your Heart Sketch
We are nearly done with our heart drawing! You can now take a little bit of white paint, along with a sharp paintbrush, and create highlights along both the center of your heart and the outline too. You can trace the left side outline of your heart sketch to create a highlight, and then the left side of the right curve.
Using a smaller and softer brush with a tiny bit of white paint, you can add some highlight curves within the two curves of your heart sketch.


Step 17: Coloring the Bow
Now we can focus on the bow, which we have decided to color in with pink. You can be creative, and can use any color you like – in fact, even your heart can be painted in a different color! Just use a normal paintbrush and your pink paint, and color the bow evenly.
We will now move on to our final step, which shows you how to add some more dimension to your bow.


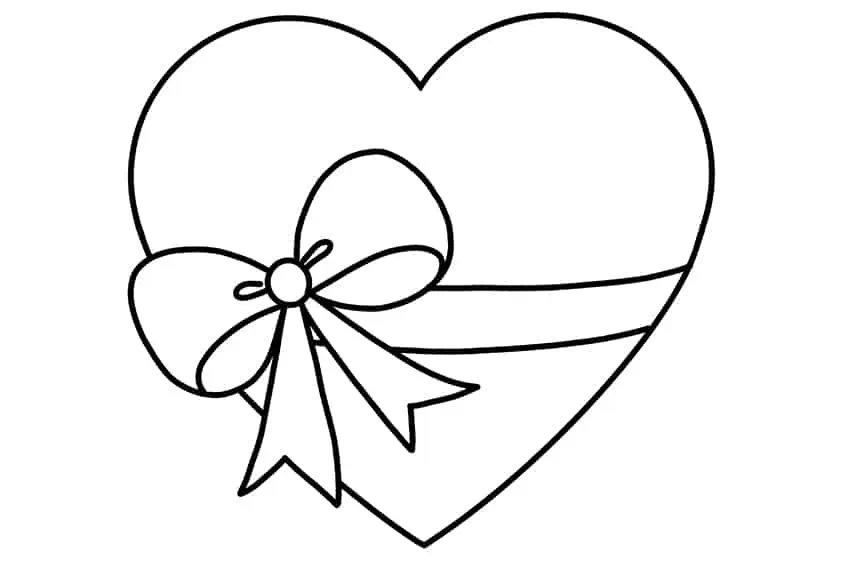
Step 18: Completing Your Heart Drawing
To complete your heart, all you will need to do now is to add more shading to your bow and the ribbon. If you decide to make your bow pink, use a darker pink paint for this step. Lightly paint the edges of your bow and along the curve, moving around the edges of the ribbon where it “hugs” your heart.
Add a few stripes on the flaps of your ribbon, and you are done!


And that is that! Well done! You have drawn a perfectly symmetrical heart, complete with a beautiful bow. Use this as a gift for a loved one or perhaps on a card for Valentine’s Day. We are sure that the object of your affection will adore your heart drawing!
Frequently Asked Questions
Will This Tutorial Teach Me How to Draw a Heart?
Most definitely yes! Many people think a heart is basic and very easy to draw, but a perfect heart drawing takes time and structure. Following our easy steps will teach you how to draw a heart the correct way.
Can I Use Any Color for My Heart Sketch?
Yes, of course, your heart can be any color you wish! The traditional color for hearts is usually red or pink because these are the colors that are associated with love, but whatever color makes your heart happy will do. Be creative!