Portrait Painting – Step by Step Instructions on Painting Portraits
This post may contain affiliate links. We may earn a small commission from purchases made through them, at no additional cost to you.
If you search the Internet for “draw a portrait”, the search engine spits out almost 10.5 million results right away. With “Draw landscape” there are almost 1.5 million less. Clearly, portrait painting is something that fascinates many people. To capture one’s own face or that of another with pencils on paper – especially in the age of the constant availability of photos and selfies – is and remains a supreme discipline of painting. With the following crash course in portrait painting, we will show you exactly how it all works.
Table of Contents
Materials Needed for Portrait Painting
To draw a good portrait, you really don’t need much. Actually, a piece of paper and a sharpened pencil is enough. You can also start to add paints and colored pencils. The more advanced you are, the more equipment you can use when drawing. I use the following material when drawing portraits:
- Suitable Drawing Paper (my favorite is not white, but ivory or greyish – so you can set even brighter accents)
- Several pencil thicknesses (e.g. HB, 3B, 8B)
- Mechanical pencils
- Carbon pencils or Black pastel pencils
- White chalk
- White fine tip gel pen
Using an eraser is not always recommended. I do not use one. Often you just smear your drawing with it and don’t make it better.
Some Exercises to Get Started
Of course, you can grab a photo and draw it immediately. But if you want to get a little more familiar with the portrait first, there are some very effective exercises to follow.
1. Take a Good Look at People
It sounds obvious and perhaps a little silly, but it helps. Every face has something that makes it unique. The more people you have drawn, the more you will perceive your fellow human beings, so to speak “with a pen in your hand”. Some have a special shine in their eyes, the next one has these great laugh lines, one has narrower eyebrows, a bigger nose, etc.
2. Cheating Makes the Master
There’s no shame in tracing your first portraits. It gives you a good sense of proportion. It’s best to draw the outlines and then shade them in freely.
3. Draw When and Where You Can
You almost always have a pen nearby. And if you are sitting listening to your teacher, lecturer, or boss, why not draw a portrait of them? Back then, together with a friend, I covered an entire bulletin board at school with portraits of teachers. Eventually, they disappeared. Even today I still wonder who where they are.
Portrait Art Basics
Learning how to paint portraits starts with a few basic techniques. Here are some of the fundamental principles to know when creating your own portrait art.
Proportions
In portrait painting, the facial proportions are decisive. Of course, every face is individual. But a few rules of thumb can’t hurt:
- There are many different face shapes. Basically, they are all variations of a more or less oval shape.
- The area from the hairline to the upper eyelid often covers about one-third of the face. The height of the forehead is often underestimated and drawn too short. Up to the tip of the nose, a minimally smaller part follows. The same applies to the lower part of the face up to the chin.
- If you draw a vertical line through the face, the point between the eyes, the tip of the nose, and the cupid’s bow (the small wave in the middle of the upper lip) lie on this line.
- The edge of the eye towards the nose is on a level with the nostril. From the root of the nose, you can draw a diagonal line to the corner of the mouth, where the nostril should also be located approximately.


Personally, I don’t work with a grid, but you can use it quite well, especially when starting out – particularly if you want to draw faces without a template.
No face is perfectly symmetrical and hardly any face will follow these rules of thumb exactly.
Half the Battle: Drawing the Perfect Eye
What do you look at when you talk to a person? Think about this. It’s not the mouth. We look into the eyes of the person we’re talking to. When someone doesn’t, it irritates us. Therefore, successful eyes almost always mean a successful portrait. It is therefore worth practicing drawing eyes. It is especially important with the eyes that you do not forget to make them shine. Therefore, you should never paint the pupils and the iris completely, but leave areas white. You may shade the iris so that it becomes a little darker towards the outside. Thus one achieves a particularly vivid expression.


Drawing the Nose
When drawing noses, often less is more: it is enough to emphasize the nostrils with light shadows. The nostrils are never round. They rather resemble lines or semicircles. Most people have a small laugh line from the nostril to the mouth. This often gives the face a lively, friendly expression.
Often the nose is so wide that the nostrils are at the level of the inner edge of the eye. Its length from root to tip usually covers slightly less than a third of the face. Since the nose does not stop growing over the course of life, older people usually have a larger nose.


Drawing the Mouth
Lips are often quite wrinkled and have many light reflections. Therefore, you should be careful when shading that you leave out parts and create a typical structure with darker lines. The upper lip always has the so-called Cupid’s bow, which can be emphasized well by a particularly bright accent. The opening of the mouth is never simply a straight line but has a slight wave shape.


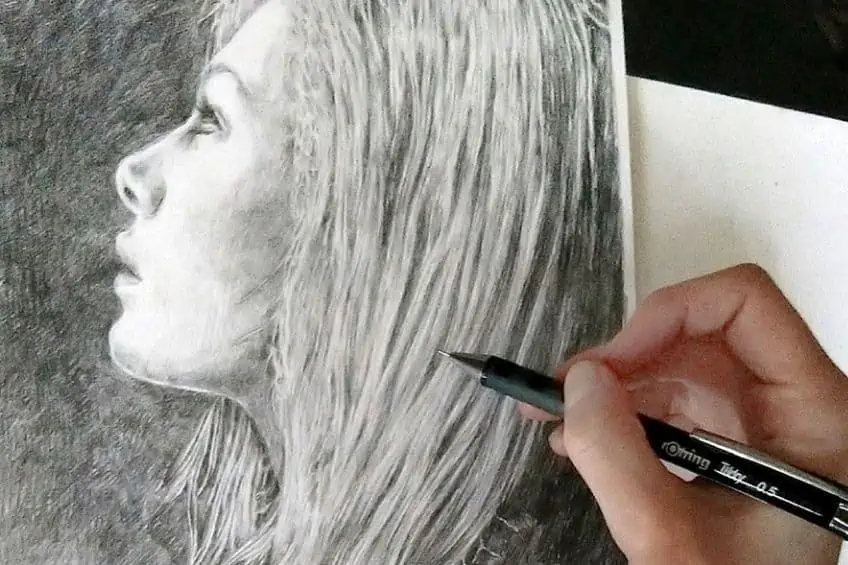
Drawing Hair
Hair is – I think – the supreme discipline in painting faces. You don’t want to have to paint each hair individually, but conversely, you want it to look as if there are over 100,000 hairs growing on your head – that’s how many the average person has. It’s important that you achieve a shiny effect with shading. To achieve this, the hair should become darker towards the tip, like the fringe in the example below. You can achieve a strand effect by shading some areas more heavily and drawing individual, darker lines.


How to Paint Faces – Step by Step
Now it’s time to get down to business: You have chosen a photo and now you want to start the portrait painting. below I have included a step-by-step portrait painting tutorial. Other artists may do this differently, and you will surely find your own way over time.
Select a Suitable Template
The great artists of past centuries had one decisive advantage and disadvantage over us: there were no photographs. That was an advantage on the one hand because if you wanted to have a picture of someone, you had to have it painted. That of course secured the commissions. But it was still a disadvantage. Because the model moves and that makes it very, very difficult to draw it.
Therefore: Try to draw your portraits from photos.
It doesn’t matter whether you take a picture of your favorite star or a photo of your grandmother. It’s easier if you start by choosing a picture where your model is facing the camera. Pictures in profile (i.e. taken from the side) or in half profile are often a bit more difficult to draw.
Look at the picture carefully before you start drawing. What is the shape of the head? What are the proportions? What features stand out? Where are shadows, where are light reflections? For this article, I have chosen a picture of my great-grandmother. I find pictures of older people particularly exciting because they tell a very special story through all the wrinkles.
Step 1: Draw the Proportions
I first take a hard to medium-hard pencil (e.g. 2H or H) and sketch the outlines of the face. For this, I take my time and compare the photo over and over. These preliminary drawings are the foundation for everything that follows. Some people find it helpful to work with a grid.
Step 2: First Shades
With a hard pencil, I now shade the areas that are to become particularly dark afterward. Again and again, I compare this with the photo: Are the shadows really there where they should go afterward? In the next step, I work on my previous shades with the paper wiper. Thereby they become softer and can be worked out better.


Step 3: Tracing Details
Details such as wrinkles, eyebrows, and hair are now drawn with a mechanical pencil with soft lead (e.g. 2B). I also darken the shades. I pay special attention to smaller wrinkles; these make the face come alive. It helps to put a piece of paper under the drawing hand so that you don’t constantly wipe through the painting.


Step 4: Bring out the Main Points
The portrait is now almost finished. It only needs the last accents to appear particularly vivid. I darken the pupils with a charcoal pencil. Also the especially dark shadows. Light reflexes I highlight with a white crayon or a white gel pencil. This is especially great if you don’t use white paper but yellowish or greyish paper.
Tip: Smooth does not exist! Advertising, Instagram and co. may make us believe it, but we all know that no face is smooth. Your portrait looks especially real when you suggest freckles, wrinkles and pores.


Mixed Media Portrait Painting
Not only pencil portraits look great. With watercolors, you can set great colored accents. Personally, I rarely color my portraits. Mostly only when I want to underline a certain statement. However, knowing how to paint faces with color can enhance the portrait quite a lot.
Tip: Use thicker paper for your portrait if you want to set colourful accents. Otherwise, the paper will have difficulty absorbing the colour.


First I colored the globe with watercolors. It is important not to create opaque color areas. Less is more! It is better to work with very strongly diluted paint and leave free surfaces. Only in the places where the shadow should be, a little more color may be used.
I especially like to set accents with a kind of blot technique. For smaller speckles, I use a bristle brush and dip it into the watercolor. Then I run my finger through the bristles to create the speckles on the painting (and everywhere else). For the bigger spots, I take a hairbrush and dip it in very diluted watercolor paint. With a little momentum, I then let the paint drip onto the painting.


Attention: If you have painted like this, make sure you look in the mirror before you leave the house next time. I’m sure you’ve taken on a few colourful freckles as well…
A Final Portrait Painting Tip
I must have painted thousands of portraits before I received any praise for them. Nevertheless, I don’t stop drawing, and portraits are especially exciting for me because every face has something different to offer when drawing. But I still miss many, many portraits. So don’t give up because you’re not satisfied with a picture for once. Drawing is so much fun and one thing is for sure: Anyone can learn to draw.
Learning how to paint portraits is a difficult, but rewarding task for any artist. Painting faces and portrait art is something that takes many years to master, so just keep on practicing. We hope that our portrait painting tutorial has inspired you to get started!


Mareike Backenköhler
Mareike Thea Backenköhler, born in 1991 in Delmenhorst in northern Germany, has always pursued painting and drawing with great pleasure. Nevertheless, after graduating from high school in 2010, she first devoted herself to her other great passions, music and literature. So she moved to Lübeck, Hamburg, Bremen and Oldenburg to study music education and German language and literature.
Today she lives in Oldenburg and works nearby as a high school teacher. In her free time she mainly draws portraits.